Comic Art
-
Original Comic Art
- Comic Art: Cover 21 items
- Comic Art: Splash Page 26 items
- Comic Art: Double Page Splash 7 items
- Comic Art: Interior Page 248 items
- Comic Art: Double Page Spread 9 items
- Comic Art: Complete Story 13 items
- Comic Art: Comic Strip 51 items
- Comic Art: Unpublished Page 5 items
- Drawings, Sketches, Paintings, etc.
- Prints and Lithographs
- Production Art
- Animation Art
- Wall Art/Posters
|
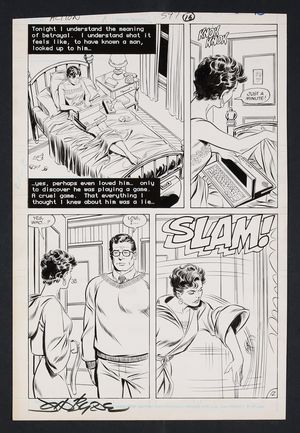
Original Art from Action Comics #597 (1988) Page 12 Pencils by John Byrne from Action Comics (1938 DC) 597 1987 DC A beautifully drawn drama page from this story that begins the march towards Superman finally revealing his identity to Lois! Running down a story, Lois heads to Smallville and gets more than she bargained for in the 'revelation' that the Kents did in fact adopt and raise Superman as a boy- alongside Clark?! The Kents' well-meaning lie has driven a huge wedge between the Daily Planet's star reporters, evidenced by the retro-digital caption boxes depicting Lois' journal entry on her LexComp laptop. Unfortunately for Lois it would be another 60ish issues before she'd finally learn the whole truth. Signed by Byrne in lower right margin. Pencil, ink and screentone on comic art board. 11" x 16 1/4". NOTE: Multiple inkers are credited for this issue- Leonard Starr, Keith Williams. |
|
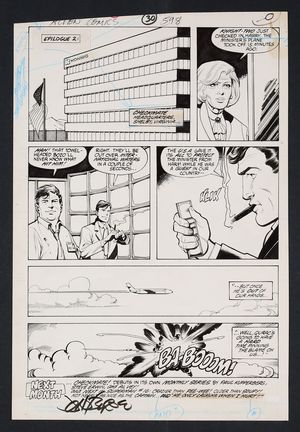
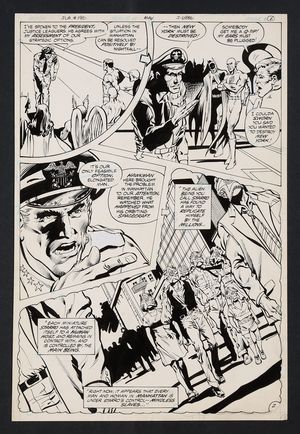
Original Art from Action Comics #598 (1988) Page 30 Pencils by John Byrne, Inks by Ty Templeton from Action Comics (1938 DC) 598 1988 DC Espionage and superheroes collide in this issue which saw the Quracan minister of defense, accused of terrorist acts himself, abducted by a rival faction. Though he was saved by Superman and a mysterious man in a knight mask, it looks like Checkmate was playing a much longer game. Likely inspired by the Iran Contra story which was all over the news at the time, Byrne captures the strange dichotomy between the glib, cowboy attitudes of the intelligence agents of Checkmate and the dangerous games they're playing. Signed by Byrne in lower left margin. Pencil and ink on comic art board. 11" x 16 1/4" |

|
Original Art from Adventures in the DC Universe #6 (1997) Page 16 Pencils by John Delaney, Inks by Ron Boyd from Adventures in the DC Universe (1997) 6 1997 DC The second chapter of this issue's story opens with the focus switching from Aquaman to Power Girl (seen in an instantly recognizable silhouette in the first panel) as the police ask for her help in stopping a group of criminals on their way to stage a jailbreak a Bell Reve! Pencil and ink on DC Comics art board. 11 1/2" x 16 1/2". |

|
Original Art from Adventures in the DC Universe #9 (1997) Page 17 Pencils by John Delaney Inks by Ron Boyd from Adventures in the DC Universe (1997) 9 1997 DC Working off a lead that there would be a microchip heist, Black Canary arrives to find that the robbery has already taken place and gets a nice dose of exposition from the battered security guard. The fifth panel on this page is especially great as we see Canary reflected in the broken glasses of the guard. Pencil and ink on DC Comics art board. 11" x 17". |

|
Original Art from Adventures in the DC Universe #9 (1997) Page 19 Pencils by John Delaney Inks by Ron Boyd from Adventures in the DC Universe (1997) 9 1997 DC A frenetic action page as Canary leaps into action with a quip that doesn't quite land for her literal-minded foe. The stylization of the DCAU line shines here with the physically opposite designs for the two villains making a fun nice contrast while Canary tries to take them both on. Pencil and ink on DC Comics art board. 11" x 17". |

|
Original Art from Adventures in the DC Universe #9 (1997) Page 20 Pencils by John Delaney Inks by Ron Boyd from Adventures in the DC Universe (1997) 9 1997 DC An action-packed fight page with Black Canary using her fighting prowess (thanks, Ted!) to take down the massive Hammer. Not much else to say other than SMEK! THUNK! KLANG! SPAK! KLUNK! Pencil and ink on DC Comics art board. 11" x 17". |

|
Original Art from Adventures in the DC Universe #9 (1997) Page 22 Pencils by John Delaney, Inks by Ron Boyd from Adventures in the DC Universe (1997) 9 1997 DC A dramatic and somewhat gruesome final page caps off Morrie's short-lived life of crime (this is his only appearance!) with a THOP! Canary uses the villain's talent for remembering everything he's ever seen or heard against him, depicted marvelously in the first panel with a dizzying array of memories and information filling his mind. Pencil and ink on DC Comics art board. 11" x 17". |

|
Original Art from Adventures in the DC Universe #11 (1998) Page 15 Pencils by John Delaney, Inks by Ron Boyd from Adventures in the DC Universe (1997) 11 1998 DC Trapped in a dimension of nightmares without his ring, Kyle Rayner is in need of a rescue- thankfully a lack of superpowers doesn't phase Wonder Woman as she stages a jailbreak in this action heavy page. Pencil and ink on DC Comics art board. 11 1/2" x 16 1/2". |

|
Original Art from Adventures in the DC Universe #11 (1998) Page 16 Pencils by John Delaney, Inks by Ron Boyd from Adventures in the DC Universe (1997) 11 1998 DC A beautifully drawn full-length panel of Toxxis, the ruler of The Pit of Despair, is the centerpiece of this page that sees the de-powered Wonder Woman and Green Lantern fight for lives against an army of henchmen. Pencil and ink on DC Comics art board. 11 1/2" x 16 1/2". |

|
Original Art from Adventures in the DC Universe #11 (1998) Page 17 Pencils by John Delaney, Inks by Ron Boyd from Adventures in the DC Universe (1997) 11 1998 DC Depowered and trapped in an alternate dimension known as The Pit of Despair, Wonder Woman and Green Lantern make a daring escape via jumping blindly through a hole in the wall! Pencil and ink on DC Comics art board. 11" x 17". |

|
Original Art from Adventures in the DC Universe #11 (1998) Page 20 Pencils by John Delaney, Inks by Ron Boyd from Adventures in the DC Universe (1997) 11 1998 DC After regaining his confidence thanks to Wonder Woman, Kyle and the Amazonian have turned the tide in their battle to escape Toxxis' Pit of Despair leading to some classic dialogue from the villain- "How dare you?! I will crush you for this insolence!" Pencil and ink on DC Comics art board. 11 1/2" x 16 1/2". |

|
Original Art from Adventures in the DC Universe #15 (1998) Page 10 Pencils by John Delaney, Inks by Ron Boyd from Adventures in the DC Universe (1997) 15 1998 DC With Zeus testing the hero by only allowing him to access his powers while in the form of Billy Batson, Captain Marvel has to figure out a way to foil a criminal plot to unleash a powerful robot. A fantastic onomatopoeia fourth panel and a great shot of the adult Captain Marvel kicking in a door (it's flimsy!) close out this page. Pencil and ink on DC Comics art board. 11" x 17". |

|
Original Art from Adventures in the DC Universe #15 (1998) Page 9 Pencils by John Delaney, Inks by Ron Boyd from Adventures in the DC Universe (1997) 15 1998 DC With Zeus' machinations leaving Billy stuck in his child form as the only way to access his powers, he finds help from a young Batman fan who's seen the true plans of the thought-to-be-foiled bank robbers. Pencil and ink on DC Comics art board. 11" x 17". |

|
Original Art from Adventures in the DC Universe #18 (1998) Page 5 Pencils by John Delaney, Inks by Ron Boyd from Adventures in the DC Universe (1997) 18 1997 DC A fantastic half splash of Amazo carving out a message in the middle of Metropolis Park with a Lantern construct opens this page with Green Lantern watching from the satellite and delivering a classic Looney Tunes line. Pencil and ink on DC Comics art board. 11" x 17". |

|
Original Art from Adventures in the DC Universe #19 (1998) Page 18 Pencils by John Delaney, Inks by Ron Boyd from Adventures in the DC Universe (1997) 19 1998 DC Double crossed by her ancient god-powered employer after stealing Wonder Woman's lasso, Catwoman proves she's not JUST a callous thief by showing up to save Diana's life and help fight the monster. A fun action page with the feline felon wielding the lasso and showing off her acrobatic skills! Pencil and ink on DC Comics art board. 11 1/2" x 17". |
|
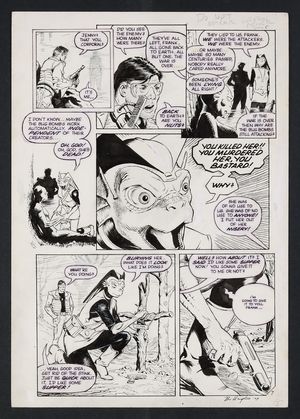
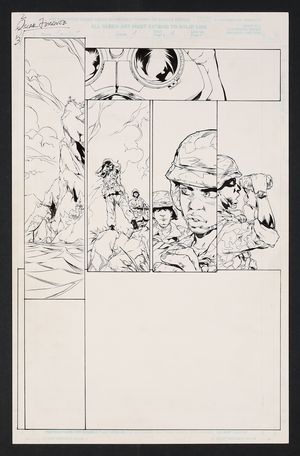
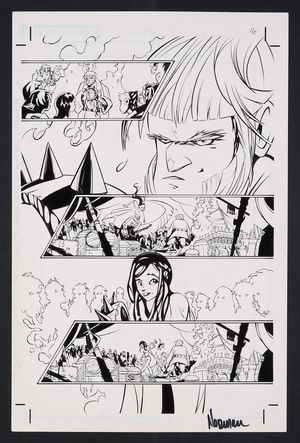
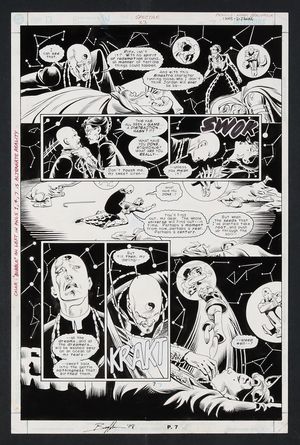
Original Art from Alien Encounters #7 (1985) Page 7 Pencils and Inks by Bo Hampton In auction ending October 14 from Alien Encounters (1985 Eclipse) 7 1985 Eclipse The penultimate page to this story about the endless cycle of war sees human soldiers Frank and Jenny reunited in the fog of battle- though Jenny, now disguised as an 'alien' has learned some things about the nature of this war and may no longer be on Frank's side. Fantastic work from Hampton here, especially in the centerpiece 5th panel as Jenny (embellished with some grease pencil!) faces her breaking point. Signed by Hampton in lower margin. Pencil and ink on art board. 11 1/4" x 16". |
|
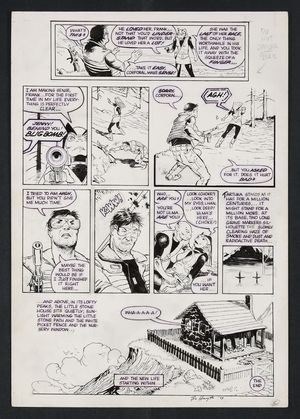
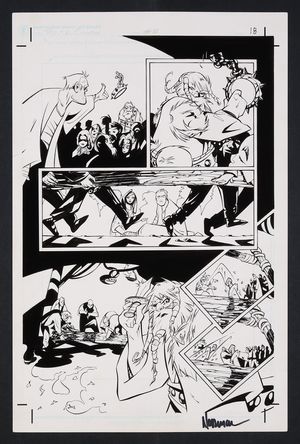
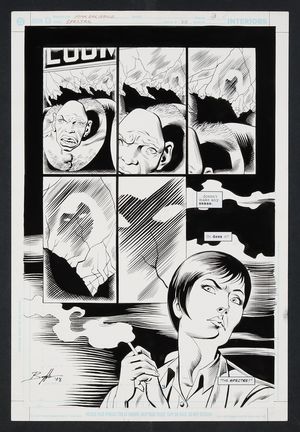
Original Art from Alien Encounters #7 (1985) Page 8 Pencils and Inks by Bo Hampton In auction ending October 14 from Alien Encounters (1985 Eclipse) 7 1985 Eclipse The dramatic final page to this story of two human soldiers fighting a war they don't understand on an alien planet! Jenny, now disguised as an alien, has learned that the humans aren't as righteous as she believed and turns on Frank before losing the showdown. We do end on a hopeful, but haunting note here as new life emerges! Signed by Hampton in lower margin. Pencil and ink on art board. 11 1/4" x 16". |
|
Original Art from All Star Batman and Robin the Boy Wonder #8 (2008) Page 15 Pencils by Jim Lee, Inks by Scott Williams from All Star Batman and Robin the Boy Wonder (2005) 8A 2008 DC "I need some tights. And a mask." says a young Dick Grayson to the "British accent" speaking to him from the darkness of the cave in this fantastic page from one of the biggest books of the 00's! Frank Miller's prequel to his legendary Dark Knight Returns is, to put it lightly, absolutely bonkers (complimentary). A much harder-edged take on the mythos, we see Batman rescue a young Dick Grayson and...lock him in the Batcave with no food and no clue what's going on. Of course the young acrobat rises to challenge and embraces his destiny with a little help from the Bat-armory, grabbing a bow and fashioning himself after Robin Hood. Signed by the artists in lower margin. Pencil and ink on DC Comics art board. 11 1/2" x 17". |
|
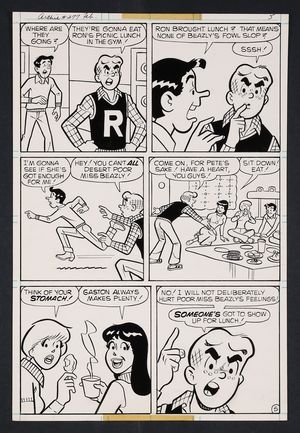
Original Art from Archie #277 (1979) Page 5 Pencils by Dan DeCarlo Jr., Inks by Jim DeCarlo In auction ending July 15 from Archie (1943 Archie Comics) 277 1979 Archie Publications Ever the people pleaser, Archie Andrews refuses to join the rest of the gang in their rejection of Lunchlady Beazly's Chicken Supreme (also known as Miss Beazly's Fowl Slop). A nice panel page featuring the whole gang and closing with a great closeup panel of a determined Archie! and ink on comic art board. 10 1/2" x 15 3/4". |
|
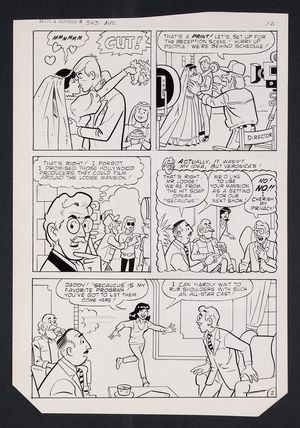
Original Art from Archie's Girls Betty and Veronica #343 (1986) Page 12 Pencils and Inks by Dan DeCarlo from Archie's Girls Betty and Veronica (1951) 343 1986 Archie Publications The wedding of Veronica Lodge! Well, kind of. Ronnie's begging convinces her father to allow the hit soap "Secaucus" to film in Lodge mansion, as well as landing her a role as J.R. Wingding's soon-to-be-dead bride. Will the glitz and glamour of TV production be everything Veronica hopes? No, no it won't. Pencil and ink on Archie Comics art board. 11 1/4" x 16 1/2". |

|
Original Art from Artemis Requiem #2 (1996) Page 8 Pencils by Ed Benes, Inks by Doug Selogy from Artemis Requiem (1996) 2 1996 DC An ominous page that brings to mind the horror mags of the 70's! Artemis has only just brushed the dirt off after rising from the grave and finds herself in the midst of a satanic nazi cult's human sacrifice ritual! Pencil and ink on DC Comics art board. 11 1/2" x 16 1/2". |
|
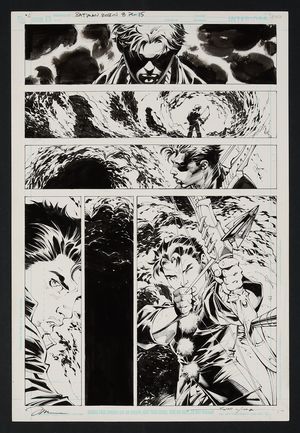
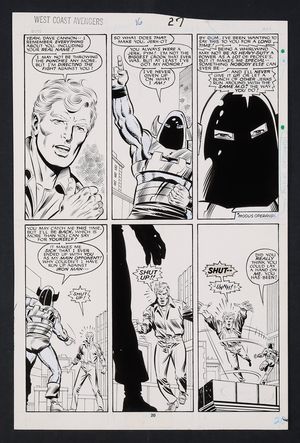
Original Art from West Coast Avengers #16 (1987) Page 20 Pencils by Al Milgrom, Inks by Joe Sinnott from Avengers West Coast (1985) 16 1987 Marvel Hank Pym, the hero formerly known as Ant-Man, Yellowjacket, and Giant Man, faces off with his archnemesis Whirlwind in a battle of...words? In an issue focused on Hank and his rocky history with, well, everything really- superheroics, science, women -the former hero is finally physically confronted with one of his failures here as he finds out that Whirlwind has some emotional issues of his own. This is a great spotlight page for one of the more troubled members of the Avengers and the standoff is depicted wonderfully by Milgrom and Sinnott as they perfectly capture the, um, whirlwind of emotions Hank and his foe are feeling. Pencil and ink on Marvel Comics art board. 10 3/4" x 16 1/2". |

|
Original Art from Baby Snoots #15 (1973) 'In the Nap of Time' Story Page 7 from Baby Snoots (1970 Gold Key) 15 1973 Gold Key A fanciful page that sees Baby Snoots and Uptite Mouse trying to help an alien from the pastry-themed world of Doughbovia find a new crown for his king! Artists are uncredited. Pencil and ink on art board. 14" x 20 1/2". |

|
Original Art from Betty & Veronica #217 (2006) Page 30 Pencils by Jeff Shultz from Betty and Veronica (1987 1st Series Archie) 217 2006 Archie Publications Despite all of the amenities Riverdale has to offer, including a lovely beach, nothing can compare to yapping on the phone with your bestie. Pencil and ink on comic art board. 11" x 17". |

|
Original Art from Birds of Prey #63 (2004) Page 8 Pencils by Cliff Richards, Inks by Alex Lei from Birds of Prey (1999 1st Series) 63 2004 DC A great central image of Batgirl on this page that sees Oracle passing along some bad intel! Looking for drugs (or at least weapons), Cassandra finds only crates full of Wonder Woman dolls- though if it helps they're probably counterfeit! Pencil and ink on DC comics art board. 11 1/2" x 17". |
|
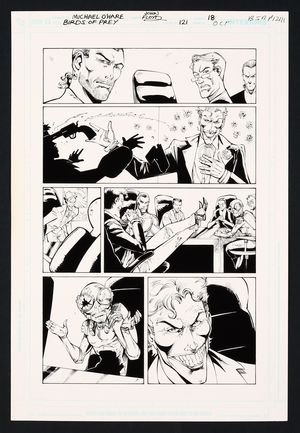
Original Art from Birds of Prey #121 (2008) Page 18 Pencils by Michael O'Hare, Inks by John Floyd from Birds of Prey (1999 1st Series) 121 2008 DC A great page featuring the classic trope of Joker committing a shocking act of violence at an otherwise 'civilized' organized crime gathering. The second panel here is especially great as we see the Joker's 'joke' gun with the 'Bang!' flag stuck in the forehead of its target! Pencil and ink on DC Comics art board. 11 1/2" x 17". |

|
Original Art from Bloodstone #3 (2002) Page 13 Pencils by Michael Lopez, Inks by Scott Hanna from Bloodstone (2001 Marvel) 3 2002 Marvel As Elsa Bloodstone wraps up her first big monster-hunting outing, we're taken to Zaire where a crew of armored troops prepare to do a little testing on a village overrun by vampires. Some great storytelling on this page, especially in that striking first panel! Signed by Hanna on the reverse. Pencil and ink on Marvel Comics art board. 11 1/4" x 17 1/4". |

|
Original Art from Bloodstone #3 (2002) Page 16 Pencils by Michael Lopez, Inks by Scott Hanna from Bloodstone (2001 Marvel) 3 2002 Marvel A great reveal for this interlude teasing the danger Elsa Bloodstone will soon face! After raining down holy water on a vampire-infested village, the masked operators return to their helicopter for evac- where it's revealed that they themselves are vampires! Signed by Hanna on the reverse. Pencil and ink on Marvel Comics art board. 11 1/4" x 17 1/4". |

|
Original Art from Captain America #9 (1997), Page 18 by Joe Bennett, inks by Mark McKenna In auction ending July 15 from Captain America (1996 2nd Series) 9 1997 Original Art from Captain America #9 (1997) page 18 by Joe Bennett, inks by Mark McKenna. This action-packed page from Cap's Heroes Reborn era sees the Star-Spangled hero taking down members of the Sons of the Serpent in almost every large panel! Pencil and ink on Image Comics art board. 11" x 17", B&W. Note: The issue credits Sandra Hope and Homage Studios with inks for this issue, but this page is signed by Mark McKenna. Also includes a copy of the original issue. |

|
Original Art from Captain Atom #6 (1987) Page 1 Pencils by Pat Broderick, Inks by Bob Smith from Captain Atom (1987 DC) 6 1987 DC An ominous opening to this issue- who is the mysterious man with the long coat and bad aura? Could he be one of THOSE types? Well, fortunately (or unfortunately) it's not a flasher- it's Dr. Spectro! Pencil and ink on DC Comics art board. 11" x 16 1/2". |

|
Original Art Captain Paragon & the Sentinels of Justice #4 (1995)Story Page 15 Pencils by Erik Larsen, Inks by Jim Sanders III from Captain Paragon and the Sentinels of Justice (1985) 4 1995 Americomics (AC) With a traitor in their midst, Captain Paragon consults with new head of security Detective Diamond to try and crack the case. Pencil and ink on art board. 12" x 17". |

|
Original Art from Cartoon Network Presents #13 (1998) Page 11 Pencils by Graham Manley, Inks by Jorge Pacheco from Cartoon Network Presents (1997) 13 1998 DC A great Herculoids page that sees Zandor and Gloop riding Zok as they bring down an alien ship that's been dumping radioactive fuel over the Herculoids valley with great spotlights for Gloop's shapeshifting and Zok's laser eyes! Signed by Pacheco in bottom margin. Pencil and ink on DC Comics art board. 11" x 17". |
|
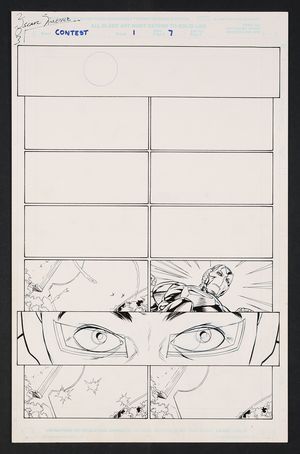
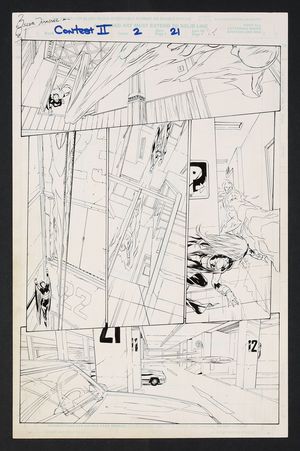
Original Art from Contest of Champions II #1 (1999) Page 1 Pencils by Oscar Jimenez, Inks by Eduardo Alpuente from Contest of Champions II (1999) 1 1999 Marvel A quiet scene about to explode opens this sequel to one of Marvel's most popular event comics! The cadets of West Point Academy are awaiting the start of a training mission- one meant to prepare them for taking on super-powered threats! Signed by Jimenez in top left margin. Pencil and ink on two sheets of Marvel Comics art board. 11" x 17 1/4". NOTE: The final panel for this page was drawn on a separate sheet of art board. Both sheets are included with this listing. |

|
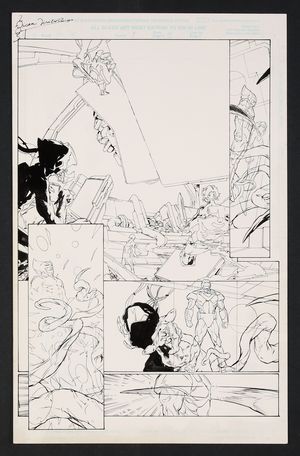
Original Art from Contest of Champions II #1 (1999) Page 10 Pencils by Oscar Jimenez, Inks by Eduardo Alpuente from Contest of Champions II (1999) 1 1999 Marvel It's never a good sign when you're unexpectedly teleported away from Earth, but that doesn't phase Johnny Storm too much once he sees his host! Here we see both Johnny and Rogue informed that they've been selected by The Coterie to compete in a "contest" with "untold benefits to reach the very stars" for humanity as a reward. Signed by Jimenez in top left margin. Pencil and ink on Marvel Comics art board. 11" x 17 1/4". |
|
Original Art from Contest of Champions II #1 (1999) Page 13 Pencils by Oscar Jimenez, Inks by Eduardo Alpuente from Contest of Champions II (1999) 1 1999 Marvel While Johnny Storm and Rogue are enamored with their generous alien hosts, Iron Man is immediately suspicious- and even more so when his suit informs him that the air is filled with nanites! Here we see the control room of the mysterious ship, with the unseen aliens ominously observing the competitors! Signed by Jimenez in top left margin. Pencil and ink on Marvel Comics art board. 11" x 17 1/4". |
|
Original Art from Contest of Champions II #1 (1999) Page 7 Pencils by Oscar Jimenez, Inks by Eduardo Alpuente from Contest of Champions II (1999) 1 1999 Marvel As Iron Man keeps tabs on Johnny Storm and Rogue during a training exercise for the military, an extraterrestrial intelligence slowly begins tracking the three heroes- which Iron Man quickly notices! Too bad it wasn't in time to stop them from being teleported away! Signed by Jimenez in top left margin. Pencil and ink on Marvel Comics art board. 11" x 17 1/4". |
|
Original Art from Contest of Champions II #2 (1999) Page 21 Pencils by Oscar Jimenez, Inks by Eduardo Alpuente from Contest of Champions II (1999) 2 1999 Marvel Having advanced past several contenders, Johnny Storm has a real challenge on his hands with this round of the contest as he faces the goddess herself- Storm! While it seems like he's a bit outclassed, Johnny makes the surprisingly clever choice to take the battle into some tight spaces which he hopes will trigger Storm's claustrophobia! Signed by Jimenez in top left margin. Pencil and ink on Marvel Comics art board. 11" x 17 1/4". |

|
Original Art from Crossgen Chronicles #3 (2001) Page 9 Pencils by George Perez, Inks by Mike Perkins from CrossGen Chronicles (2000) 3 2001 CrossGen Comics A prequel story that deepens the lore of the world of Meridian, this issue tells the story of how Sephie's parents met. This fancifully romantic page sees Ideria realize that her feelings for Turos may mean more than her desire for adventure. Perez and Perkins make a fantastic penciller/inker team! Blue line pencil and ink on Crossgen comic art board. 11" x 17". |

|
Original Art from Daredevil #235 (1986) Page 31 Breakdowns by Steve Ditko, Finishes by Danny Bulanadi from Daredevil (1964 1st Series) 235 1986 Marvel After a night of battling Mr. Hyde and doing some self-reflection, Matt Murdock is need of a nice stroll with Karen. Unfortunately, an encounter with a childhood bully sends Matt back into brooding mode. Some wonderful layouts by Ditko here, especially the last panel, that Bulandani finishes with rich inks. Pencil and ink on Marvel Comics art board. 11" x 16 3/4". NOTE: Three word balloons are missing from the page. A transparent overlay with printed replacements attached has been affixed to the rear with masking tape. |

|
Original Art from Deadpool #17 (1998) Page 17 Pencils by Walter McDaniel, Inks by John Livesay from Deadpool (1997 1st Series) 17 1998 Marvel Is Deadpool the prophesied intergalactic messiah known as the Mithras said to bring about a universal utopia? A group of employees from the intergalactic holding company Landau, Luckman, and Lake seem to think so, even if the Merc With a Mouth doesn't! We get a beautiful central image of Deadpool aiming his gun at Zoe Culloden on this page which is hilariously undercut just below. Signed by McDaniel at top of page. Pencil and ink on Marvel Comics art board. 11" x 17 1/4". |

|
Original Art from Deadpool Kills the Marvel Universe #1 (2012) Page 11 Pencils and Inks by Dalibor Talajic from Deadpool Kills the Marvel Universe (2012) 1A 2012 Marvel While it would seem that being bound in straight jacket and placed in asylum might be helpful to Deadpool in a lot of ways, the benefits are cancelled out when that asylum is Ravencroft! The first issue of this now classic series sees Deadpool convinced to cut a bloody swath through the entirety of the Marvel Universe thanks to the meddling of Dr. Pyscho posing as a psychiatrist. Blue line pencil and ink on Marvel Comics art board. 11" x 17 1/4". |
|
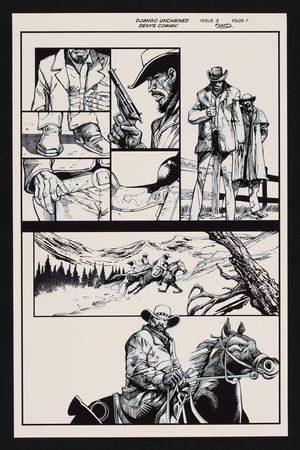
Original Art from Django Unchained #3 (2013) Page 1 Inks by John Floyd, Printed Pencils by Denys Cowan In auction ending July 15 from Django Unchained (2012 DC Vertigo) 3A 2013 DC A tremendous first page that sees Django's partnership with King Schultz begin in earnest as he checks out his new gear and the two head off to take down their next bounty. Everything you could want on a western page! Also included is a partial page with redraws of certain elements and panels from the full page. These changes were likely done at the behest of editorial and were then scanned and placed over the scan of the full page digitally. Ink over printed pencils on comic art board. Full page measures 11" x 17", partial page measures 11" x 7 1/4". NOTE: Portions of the inks on the full page, mainly solid black areas, are also printed in addition to the pencils. All inks on the partial page are hand inked over printed pencils. |
|
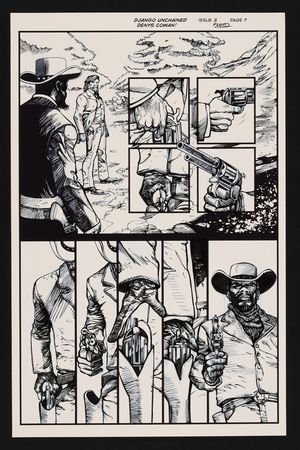
Original Art from Django Unchained #3 (2013) Page 7 Inks by John Floyd, Printed Pencils by Denys Cowan In auction ending July 15 from Django Unchained (2012 DC Vertigo) 3A 2013 DC jango's bounty hunter training progresses as he perfects his draw in this extremely cool page! Also included is a partial page with a redraw of the last panel from the full page. This change was likely done at the behest of editorial and was then scanned and placed over the scan of the full page digitally. Ink over printed pencils on comic art board. Full page measures 11" x 17", partial page measures 4 3/4" x 11". NOTE: Portions of the inks on the full page, mainly solid black areas, are also printed in addition to the pencils. All inks on the partial page are hand inked over printed pencils. |
|
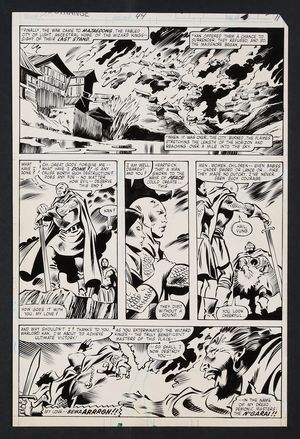
Original Art from Doctor Strange #44 (1980) Page 11 Pencils by Gene Colan, Inks by Dan Green from Doctor Strange (1974 2nd Series) 44 1980 Marvel As Doctor Strange and his allies prepare for all out war with Shialmar's forces, Wong "spins a tale of betrayal and sacrifice" as he tells the story of Kan, his ancestor and once time lover of Shialmar. Here we see Kan and Shaialmar observing the aftermath of the war they fought against the Wizard Kings- and their betrayal at the hands of Vung and his masters the N'Garai. It's a beautiful page with great scene setting first panel and some of Colan's trademark figurework. Pencil and ink on Marvel Comics art board. 10 1/2" x 15 3/4". |

|
Original Art from Doctor Strange #60 (1983) Page 12 Pencils by Dan Green, Inks by Terry Austin from Doctor Strange (1974 2nd Series) 60 1983 Marvel Under the command of Dracula himself, a mob of vampires are assaulting Avengers mansion- and the only one who knows what's going on is the Master of the Mystic Arts himself (with a little assist from Hannibal King)! A great panel page with some great spell-slinging and an absolutely stunning second panel where Green and Austin render Dracula's thralls in heavy, spooky shadow. Signed by Green in lower margin. Pencil and ink on Marvel Comics art board. 11" x 16". |

|
Original Art from Doctor Strange #42 (1992) Page 26 Pencils and Inks by Geof Isherwood from Doctor Strange (1988 3rd Series) 42 1992 Marvel An Infinity War crossover! Rintrah is unexpectedly left on his own as Clea hops into a portal on an unknown mission while we Doctor Strange has already left with Galactus! Rich, beautiful work by Isherwood here, especially on Clea and Rintrah in the inset first panel! Signed by the artist in lower margin. Pencil and ink on Marvel Comics art board. 11 1/4" x 17 1/4". |

|
Original Art from Exiles #67 (2005) Page 16 Pencils by Jim Calafiore, Inks by Mark McKenna from Exiles (2001 1st Series Marvel) 67 2005 Marvel The multiverse hopping mutants find themselves in a world plagued by giant monsters, kept at bay only by the Science Squad! Arriving on this earth seeking the aid of its Curt Conners, the team must first help the Science Squad defeat Krakoa, The Island that Walks Like a Man. Hey, those ships look kind of familiar...wonder if they can combine to form a large mech... Signed by Calafiore in bottom margin. Pencil and ink on Marvel Comics art board. |

|
Original Art from Fantastic Four #114 (1971), Page 21 by 'Big' John Buscema with inks by Frank Giacoia from Fantastic Four (1961 1st Series) 114 1971 Marvel Original Art from Fantastic Four #114 (1971), Page 21 by "Big" John Buscema with inks by Frank Giacoia. The first panel features Mr. Fantastic in a striking pose, looking out from the Baxter building and considering his next move. The rest of page follows the mysterious Over-Mind as he returns to his ship and tames a wild dog with his powers. Nice, tight line work on beautiful Bronze Age art! Pencil and ink on art board. 15 3/4" x 10 3/4", B&W. |

|
Original Art from Fantastic Four #114 (1971), Page 23 by 'Big' John Buscema with inks by Frank Giacoia from Fantastic Four (1961 1st Series) 114 1971 Marvel Original Art from Fantastic Four #114 (1971), Page 23 by John Buscema with inks by Frank Giacoia. The Over-Mind, an Eternal known also as Grom, makes his second appearance in comics in this powerful Bronze Age page. Over-Mind is seen here in all his powerful glory tossing aside scrap cars as well as opening his ship with telekinesis. A fantastic showcase for this deadly villain! Pencil and ink on art board. 15 3/4" x 10 3/4", B&W. |

|
Original Art from Fantastic Four #304 (1987), Page 20 by 'Big' John Buscema with inks by 'Joltin' Joe Sinnott from Fantastic Four (1961 1st Series) 304 1987 Marvel Original Art from Fantastic Four #304 (1987), Page 20 by 'Big' John Buscema with inks by 'Joltin' Joe Sinnott. It's a battle for the ages as Quicksilver, mad with jealousy, kidnaps Alicia Masters and attacks the FF! On this very climactic page, Ben sets him up and Johnny knocks him down (with a PLOW!) ending the battle with a single flaming punch! A Bronze Age battle page at its best! Pencil and ink on art board. Signed by Sinnott on the reverse and dated 1/87. 16 1/2" x 10 3/4", B&W. Minor light glue staining. |
|
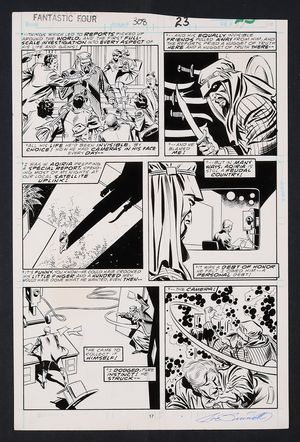
Original Art from Fantastic Four #308 (1987) Page 17 Breakdowns by John Buscema, Finishes by Joe Sinnott from Fantastic Four (1961 1st Series) 308 1987 Marvel A fantastic villain origin page from Big John and Joltin' Joe introduces us to Farouk Al-Fasaud, Oil Minister for the fictional Middle Eastern country of Aqiria whose manipulation of global markets (which made him the richest man in the world) was exposed by reporter Gregory Dunabr. In an attempt to get revenge on Dunbar, Farouk attempts to assassinate him with a blade but misses, striking the satellite uplink equipment and...somehow gaining electronic/digital powers. Well, it looks great, especially the horror-inspired second panel, the noirish third, and the action-packed sixth which is filled to the brim with Kirby Krackle! Signed by Sinnott in lower margin. Pencil and ink on Marvel Comics art board. 11" x 16 1/2". |

|
Original Art from Fantastic Four #388 (1994) Page 17 Pencils by Paul Ryan, Inks by Danny Bulanadi from Fantastic Four (1961 1st Series) 388 1994 Marvel Time travel almost never works out the you want it to, even if you're in the Fantastic Four! After showing up in the Silver Age on the trail of the mysterious Dark Rider, the FF's 90's looks and attitudes find themselves tangling with their past selves- and the Avengers! Bulanadi does a beautiful job inking Ryan here, with a level of detail and texture not apparent in the colored published pages. Signed by Ryan in left margin. Pencil and ink on Marvel Comics art board. 11" x 17". NOTE: One word balloon is missing from the 6th panel ("YOW!"). |

|
Original Art from Fantastic Four #388 (1994) Page 29 Pencils by Paul Ryan, Inks by Danny Bulanadi from Fantastic Four (1961 1st Series) 388 1994 Marvel A stunner of a first panel opens this tragic page! After the mysterious Dark Raider strikes a decisive blow, killing the Reed and Sue of the Silver Age the villain disappears into the time stream, leaving the Avengers and both groups of FFs to ponder their next move- with the Franklin Richards of the future making plans of his own. Signed by Ryan below third panel. Pencil and ink on Marvel Comics art board. 11" x 17". |

|
Original Art from Fathom #5 (2006) Page 19 Pencils by Koi Turnbull, Inks by Jason Gorder from Fathom (2005 Aspen 2nd Series) 5 2006 Aspen A long-awaited reunion between father and daughter quickly turns to panic as Aspen's appearance at her adopted father's desert home triggers a trap set by Maylander. Some fantastic sequential work by the artists here as Captain Matthew's expression turns from warmth to terror in an instant. Also included is a copy of the published issue. Pencil and ink on Aspen Comics art board. 11" x 17". |

|
Original Art from Fathom #8 (2006) Page 4 Pencils by Koi Turnbull, Inks by Jonathan Glapion from Fathom (2005 Aspen 2nd Series) 8A 2006 Aspen A romantic scene on the beach as Aspen and Chance mourn their lack of alone time in a quiet moment before she heads off to the city of Saba. Also included is a copy of the published issue. Pencil and ink on Aspen Comics art board. 11" x 17". |

|
Original Art from The First #18 (2002) Page 12 Pencils by Andrea Di Vito, Inks by Rob Hunter from First (2000) 18 2002 CrossGen Comics The long lost leader Altwaal watches the fire and waits for the intruder he knows his coming! Pencil and ink on Crossgen comic art board. 11" x 17". NOTE: Tape affixed to the top of the page in margin. |

|
Original Art from First Love Illustrated #60 (1956 Harvey), Page 25 'Acceptable Accessories!' Pencils and Inks by Tom Hickey from First Love Illustrated (1949-1963 Harvey) 60 1956 Harvey Original Art from First Love Illustrated #60 (1956 Harvey), Page 25 'Acceptable Accessories!' Pencils and Inks by Tom Hickey. A check list for the essential accessories- Hats, Gloves, Leather Belts, Jewelry, Purses, and Opera Pumps. All finely illustrated by Tom Hickey. Pencil and ink on art board. 15" x 22", B&W. |
|
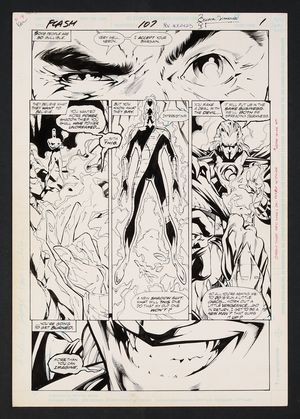
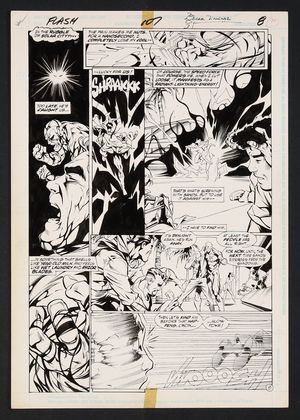
Original Art from Flash #107 (1995) Page 1 Pencils by Oscar Jimenez, Inks by Jose Marzan Jr. from Flash (1987 2nd Series) 107 1995 DC Underworld Unleashed hits the Scarlet Speedster! The opening page to this event tie-in issue finds the Shadow Thief (Carl Sands) making his deal with Neron for some buffed up powers, namely a new Shadow Suit that allows him to extend his powers past his body to other people and objects. Great layout from Jimenez and beautiful inks from veteran Marzan! Signed by Jimenez in top margin. Pencil and ink on DC Comics art board. 11 1/2" x 16 1/2". |
|
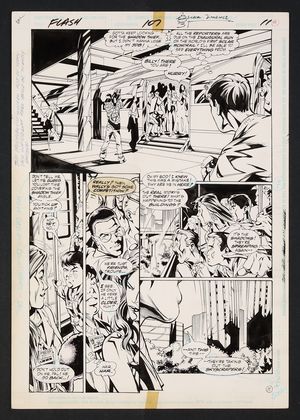
Original Art from Flash #107 (1995) Page 11 Pencils by Oscar Jimenez, Inks by Jose Marzan Jr. from Flash (1987 2nd Series) 107 1995 DC While Flash continues to search for clues as to why Shadow Thief is targeting Solar City, Captain Marvel switches back to Billy Batson so he can focus on his day job as a reporter for WHIZ and do a big bantering with his colleagues- including Linda Park! Signed by Jimenez in top margin. Pencil and ink on DC Comics art board. 11 1/2" x 16 1/2". |
|
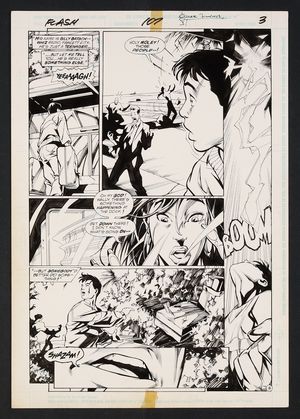
Original Art from Flash #107 (1995) Page 3 Pencils by Oscar Jimenez, Inks by Jose Marzan Jr. from Flash (1987 2nd Series) 107 1995 DC WHIZ radio reporter Billy Batson is assigned to cover the opening of Solar City, a solar-powered island resort- and it's a good thing too as he quickly finds that Captain Marvel's presence is also required! With trouble imminent, we get a fantastic page-length vertical panel of Billy calling down the lightning with the magic word SHAZAM. Signed by Jimenez in top margin. Pencil and ink on DC Comics art board. 11 1/2" x 16 1/2". |
|
Original Art from Flash #107 (1995) Page 8 Pencils by Oscar Jimenez, Inks by Jose Marzan Jr. from Flash (1987 2nd Series) 107 1995 DC An unexpected team-up for Wally and Billy as Flash and Captain Marvel find themselves battling a powered-up Shadow Thief on the futuristic island resort of Solar City! Left in the dark as the villain makes his escape, the color-coordinated pair shake off the shadows and get back in the fight giving us the rare site of Flash being left in the dust! Another great feature of this page is present in that last panel- in order to achieve the effect of the speed lines as Captain Marvel zooms away, Marzan inked them fully and then scored the page to break them up! Signed by Jimenez in top margin. Pencil and ink on DC Comics art board. 11 1/2" x 16 1/2". |
|
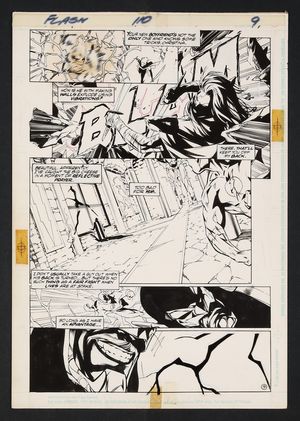
Original Art from Flash #110 (1996) Page 9 Pencils by Oscar Jimenez, Inks by Jose Marzan Jr. from Flash (1987 2nd Series) 110 1996 DC Anxious to take the fight directly to the mysterious villain Savitar, Flash quickly dispatches wayward speedster and former "Lady Flash" Christina Alexandrova before making a sneaky approach on the Big Bad, though judging by that ominous smile in the last panel this isn't gonna go Wally's way! Signed in top margin (beneath overlay) by Jimenez. Pencil and ink on DC Comics art board with acetate overlay featuring additional inks affixed at the top with tape. |
|
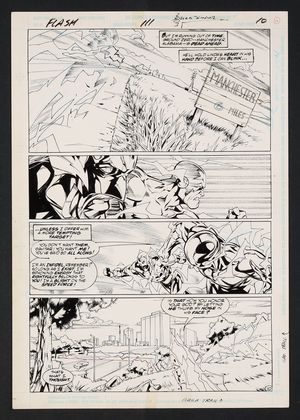
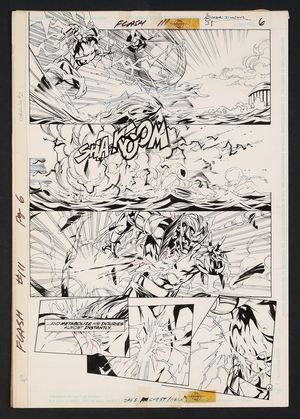
Original Art from Flash #111 (1996) Page 10 Pencils by Oscar Jimenez, Inks by Jose Marzan Jr. from Flash (1987 2nd Series) 111 1996 DC Savitar's coast-to-coast rampage begins to take focus as he leads Wally towards the town of Manchester, Alabama- where Linda Park is! The second panel features a great close shot of the two speedsters as Wally realizes he needs to draw Savitar away, pushing himself to the limit in order to get the villain's attention. Signed by Jimenez in top margin. Pencil and ink on DC Comics art board. 11 1/2" x 16 1/2". |
|
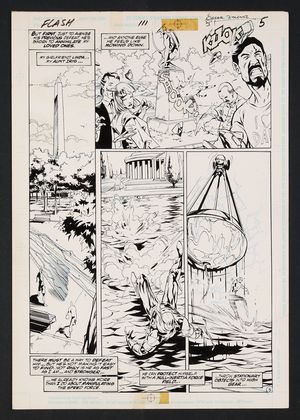
Original Art from Flash #111 (1996) Page 5 Pencils by Oscar Jimenez, Inks by Jose Marzan Jr. from Flash (1987 2nd Series) 111 1996 DC Flash's confrontation with Savitar goes coast to coast! Speeding back and forth across the country trying to mitigate the collateral damage, Flash is barely able to keep up with the villain. As a bonus we get a semi-cameo from the then-dead Green Arrow as Savitar smashes a statue dedicated to the Emerald Archer. with Signed by Jimenez in top margin. Pencil and ink on DC Comics art board. 11 1/2" x 16 1/2". |
|
Original Art from Flash #111 (1996) Page 6 Pencils by Oscar Jimenez, Inks by Jose Marzan Jr. from Flash (1987 2nd Series) 111 1996 DC A great villain showcase page for Savitar as he uses his mastery of the Speed Force to fling an ocean buoy at Flash and quickly heal the injuries he sustained from the blowback. Signed by Jimenez in top margin. Pencil and ink on DC Comics art board with acetate overlay that includes some additional inks for panel 2. The overlay was at one point attached to the page on the left edge but has become detached. 11 1/2" x 16 1/2". |
|
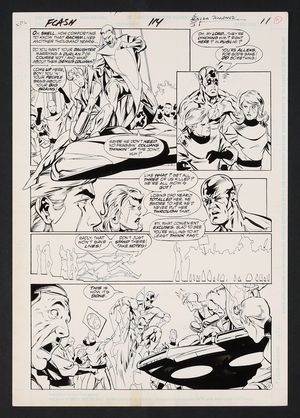
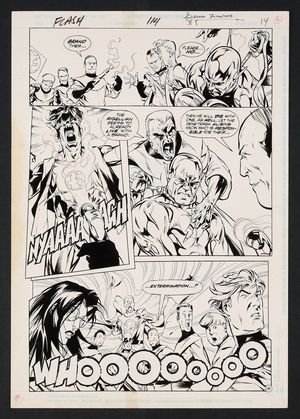
Original Art from Flash #114 (1996) Page 11 Pencils by Oscar Jimenez, Inks by Jose Marzan Jr. from Flash (1987 2nd Series) 114 1996 DC Pinballing through time, Wally finds himself in the 30th century alongside Barry Allen's future-born twin children Don and Dawn Allen! Unfortunately, the future isn't as advanced as Wally had hoped as the trio stumble into a "rally" against Earth's entry into the United Planets- one that's quickly devolving into a lynching. This is a nice hero moment as Wally finds himself the only one willing to stand up for justice in this time. Signed by Jimenez in top margin. Pencil and ink on DC Comics art board. 11 1/2" x 16 1/2". |
|
Original Art from Flash #114 (1996) Page 12 Pencils by Oscar Jimenez, Inks by Jose Marzan Jr. from Flash (1987 2nd Series) 114 1996 DC Flung to the 30th century, Wally West quickly finds himself in the middle of a protest against Earth's joining the United Planets- a protest that has quickly devolved into the lynching of a Coluan. Only Wally seems interested in stopping the brutality, but quickly finds himself a victim as well as the angry mob labels him a "Scarlet Rigellian" and begins to attack in this harrowing scene. Signed by Jimenez in lower margin. Pencil and ink on DC Comics art board with acetate overlay featuring additional inks affixed to the top with tape. 11 1/2" x 16 1/2". |
|
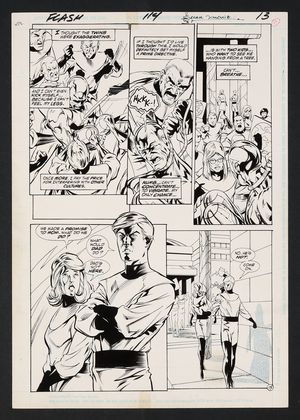
Original Art from Flash #114 (1996) Page 13 Pencils by Oscar Jimenez, Inks by Jose Marzan Jr. from Flash (1987 2nd Series) 114 1996 DC Finding himself in the 30th century, Wally West comes upon the lynching of a Coluan and becomes the target of the mob himself! His only hope for escape lies in Don and Dawn Allen, the twin children of Barry who themselves weren't too happy to see the man who knew their father better than they ever could. A dramatic, harrowing page thanks to the perfect mixture of DC lore, real world parallels, and family dynamics! Signed by Jimenez in top margin. Pencil, ink, and screentone on DC Comics art board. 11 1/2" x 16 1/2". |
|
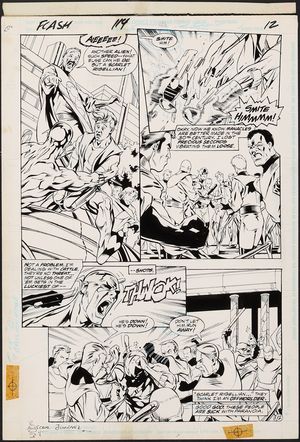
Original Art from Flash #114 (1996) Page 14 Pencils by Oscar Jimenez, Inks by Jose Marzan Jr. from Flash (1987 2nd Series) 114 1996 DC A bold page that finds Flash and an innocent Coluan apprehended by an anti-alien mob in the 30th century! Though technology as advanced quite a bit, the brutality of man is the same as ever evidenced by the futuristic tools used to 'brand' offworlders with an image of earth. Thankfully it looks like a rescue is at hand in the dynamic last panel! Signed by Jimenez in top margin. Pencil and ink on DC Comics art board. 11 1/2" x 16 1/2". |
|
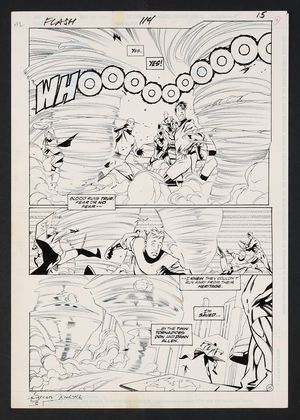
Original Art from Flash #114 (1996) Page 15 Pencils by Oscar Jimenez, Inks by Jose Marzan Jr. from Flash (1987 2nd Series) 114 1996 DC Just as Flash and the Coluan he was attempting to save from a xenophobic mob in the 30th century were about to be murdered, two mysterious whirlwinds appear to scatter the crowd! Who could be at the center of storm? Don and Dawn Allen, twin children of Barry who, despite their aversion to heroics, step in to save the day. Signed by Jimenez in top margin. Pencil and ink on DC Comics art board. 11 1/2" x 16 1/2". |

|
Original Art from Flash #208 (2004) Page 18 Pencils by Howard Porter, Inks by John Livesay from Flash (1987 2nd Series) 208 2004 DC In dealing with the emotional fallout of having the Spectre erase the knowledge of his identity from everyone on earth, Wally West is going through a bit of a (lowercase) crisis. After being rescued from a Rogues attack by Jay Garrick and Bart Allen, the trio of speedsters are invited to take a look at the new Flash Museum. Porter and Livesay do some tremendous scene work on this page, with the intricately drawn tile mosaic (donated by Bruce Wayne!) and the display of D-list heroes. Pencil and ink on DC Comics art board. 11 1/2" x 17". |

|
Original Art from Flash #208 (2004) Page 19 Pencils by Howard Porter, Inks by John Livesay from Flash (1987 2nd Series) 208 2004 DC Much of Geof Johns' DC work revolves around the theme of legacy, and his Flash run is no different. Porter and Livesay do a beautiful job of conveying that in this emotional page that finds Wally West scrambling to make sense of his life in the wake of The Spectre erasing his identity from the minds of everyone on earth- including his friends. Signed by Porter in lower margin. Pencil and ink on DC Comics art board. 11" x 17". |
|
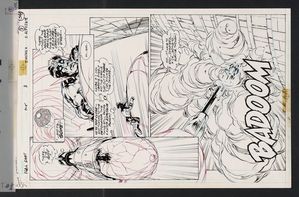
Original Art from Flash 80-Page Giant #1 (1998) Page 56 Pencils by Oscar Jimenez, Inks by Eduardo Alpuente from Flash 80-Page Giant (1998) 1 1998 DC The time-hopping Flash of the Future John Fox finds himself in a time period where nuclear war is imminent- so imminent that within minutes he finds himself on top of a just-launched warhead on this thrilling page! Signed by Jimenez in top right margin. Pencil and ink on Image Comics art board with vellum overlay for additional effects attached at the top with tape. Board measures 11" x 17", overlay is slightly wider. |
|
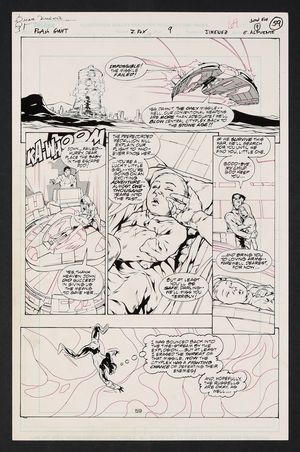
Original Art from Flash 80-Page Giant #1 (1998) Page 57 Pencils by Oscar Jimenez, Inks by Eduardo Alpuente from Flash 80-Page Giant (1998) 1 1998 DC A nice cliffhanger page as John Fox, the time-hopping Flash of the Future attempts to use his powers to turn a nuclear missile intangible with his speed powers...if he has enough TIME! Signed by Jimenez in top right margin. Pencil and ink on Image Comics art board with vellum overlay for additional effects attached at the top with tape. Board measures 11" x 17", overlay is slightly wider. |
|
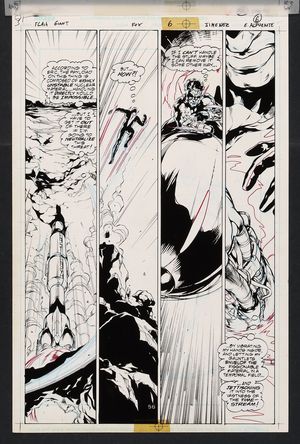
Original Art from Flash 80-Page Giant #1 (1998) Page 58 Pencils by Oscar Jimenez, Inks by Eduardo Alpuente from Flash 80-Page Giant (1998) 1 1998 DC John Fox, the time-travelling Flash of the Future arrives in the year 2945 and almost immediately finds himself attempting to stop a nuclear war! On this climactic page we see that John was able to dispose of a missile's nuclear warhead, but the missile itself is still barreling towards its target! Signed by Jimenez in top right margin. Pencil and ink on Image Comics art board with vellum overlay for additional effects attached at the top with tape. Board measures 11" x 17", overlay is slightly wider. |
|
Original Art from Flash 80-Page Giant #1 (1998) Page 59 Pencils by Oscar Jimenez, Inks by Eduardo Alpuente from Flash 80-Page Giant (1998) 1 1998 DC John Fox, the time-displaced Flash of the Future, has averted nuclear armageddon for the world of 2945 but the war still marches on! As Fox is thrust back into the timestream, the kindly couple who helped him get his bearings prepare to save their daughter in a very familiar way! Signed by Jimenez in top right margin. Pencil, ink, and screentone on Image Comics art board. 11" x 17". |

|
Original Art from GI Combat #202 (1977) Page 49 Pencils and Inks by Romeo Tanghal from GI Combat (1952) 202 1977 DC From the short and nasty story titled "AWOL...Until DOOMSDAY", a great page that sees some nazis get their comeuppance! After massacring a group of Canadian soldiers and dumping their bodies in the river, the nazis decide to go for a swim themselves- not realizing that retribution can happen in an instant as they're grabbed from below. Pencil and ink on comic art board. 10 1/2" x 15 3/4" |

|
Original Art from GI Combat #206 (1978) Page 18 Pencils and Inks by ER Cruz from GI Combat (1952) 206 1978 DC From the OSS story titled "The 2 Faces of the General" a dramatic opening scene of General Eisenhower being assassinated by Axis forces...or was he? The shocking opening is revealed to be staged for the benefit of the real Eisenhower in the beautifully drawn fourth panel, contrasting the action of opening with the shadow world of intelligence operations. Pencil and ink on comic art board. 10 1/2" x 15 1/2". |

|
Original Art from GI Combat #225 (1981) Page 24 Pencils & Inks by ER Cruz from GI Combat (1952) 225 1981 DC A prime example of how suited Cruz's art was to depicting the espionage of World War 2! Under orders from Control, operative Phoenix has snuck himself into Italy to ambush and capture Hitler's head of chemical weapons. Cruz's inking truly shines here, especially in the first panel as the mounted nazis are bathed in machine gun fire. Pencil and ink on comic art board. 10 1/2" x 15 3/4". |

|
Original Art from Girls' Romances #134 (1968) Page 10 Pencils by Jack Sparling from Girls' Romances (1950) 134 1968 DC Paula's romantic misadventures have come to an end in light of refraining from documenting everything about her relationship with Rudy in her diary- a revelation she comes to for herself in the optimistic final panel. Pencil and ink on art board. 10 3/4" x 16". |

|
Original Art from Girls' Romances #134 (1968) Page 5 Pencils by Jack Sparling from Girls' Romances (1950) 134 1968 DC Paula's obsession with documenting her romantic adventures in her diary leads her on trip down memory lane as she remembers her past paramours- and what led to their breakups! Pencil and ink on art board. 10 3/4" x 16". |

|
Original Art from Girls' Romances #134 (1968) Page 6 Pencils by Jack Sparling from Girls' Romances (1950) 134 1968 DC Paula's breakup with Stan is depicted here in a beautifully dramatic fashion as she realizes that her obsession with documenting everything in her diary may be what's causing her relationships to fizzle out. A fantastic example of the dramatic framing that makes romance comics a great showcase for visual storytelling. Pencil and ink on art board. 10 3/4" x 16". |

|
Original Art from Green Lantern Corps #63 (2011) Page 2 Pencils & Inks by Joe Prado from Green Lantern Corps (2006 1st Series DC) 63A 2011 DC A fantastic showcase for Boodikka, a Lantern from a warrior society (and one time sexual partner of Lobo!) who eventually gave up much of her organic body to become an Alpha Lantern. Here we see her in all three forms- as an Alpha Lantern grappling with her new life, as a warrior on the planet Bellatrix, and as a member of the Green Lantern Corps! Signed by the artist in bottom margin. Pencil and ink on DC COmics art board. |

|
Original Art from Guardians of the Galaxy #5 (2019) Page 18 Pencils and Inks by Geoff Shaw from Guardians of the Galaxy (2019 6th Series) 5A 2019 Marvel Thanos is dead, long live Thanos! After Gamora assassinated her father to stop him from once again using the Infinity Gems, the galaxy has been in chaos- chaos orchestrated by Hela in order to set the conditions to bring Thanos back. After springing her trap and placing Thanos' consciousness in the body of Eros (Starfox), here we see the pair examining the new body she has constructed for the Mad Titan! Red pencil and ink over printed roughs on art board. 11" x 17". |
|
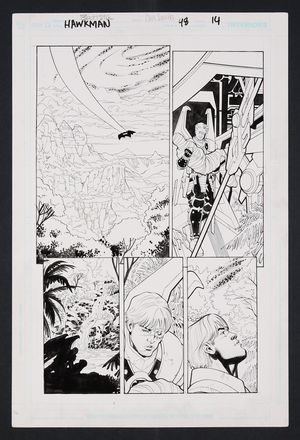
Original Art from Hawkman #48 (2006) Page 14 Pencils by Chris Batista, Inks by Cam Smith from Hawkman (2002 4th Series) 48 2006 DC A tragic loss for the villain turned ally to Hawkman as Ch'al Andar, also known as the Golden Eagle, journeys back to New Thanagar to lay his father to rest after he was killed by Blackfire. Pencil and ink on DC Comics art board. 11 1/4" x 17 1/4". |
|
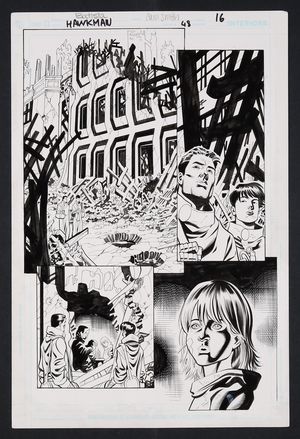
Original Art from Hawkman #48 (2006) Page 16 Pencils by Chris Batista, Inks by Cam Smith from Hawkman (2002 4th Series) 48 2006 DC A moody page set near the end of the Rann/Thanagar War! On Rann, Hawkman and Hawkgirl take an incognito walk through the city of Kamorak, pondering the devastation and the affect war has had on their multiple lives. Batista and Smith do a phenomenal job of creating the war-torn setting here, hammered home by the haunted expression on the little Rannian girl in the last panel as another attack announces itself with a boom. Pencil and ink on DC Comics art board. 11 1/4" x 17 1/4". |
|
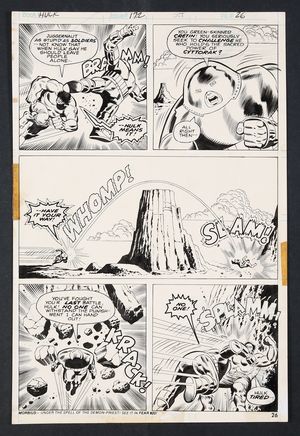
Original Art from Incredible Hulk #172 (1973) Page 26 Pencils by Herb Trimpe, Inks by Jack Abel from Incredible Hulk (1962 Marvel 1st Series) 172 1973 Marvel An absolutely magnificent page that sees two of Marvel's biggest bruisers facing off in an epic showdown! After the new commander of Hulkbuster Base One orders that Hulk be exiled to a limbo-like dimension, he (along the rest of the base...and the surrounding areas...) is surprised when another exile comes through the opening- the Juggernaut! Together, the two titans escape the facility and head for open air. In a neat reversal of the standard meet-fight-team-up comic trope, it's AFTER the team-up that Hulk realizes Juggy isn't on the side of angels and requires a little smashing. Trimpe's layouts here are great with four solid action panels framing the fantastic wide panel of Juggernaut slamming the Hulk clear over a massive rock formation! Pencil and ink on Marvel Comics art board. 10 3/4" x 16". |
|
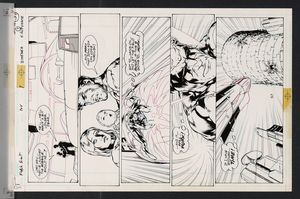
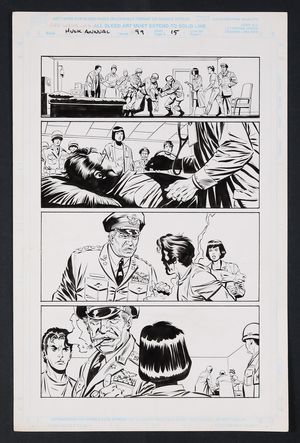
Original Art from Incredible Hulk Annual 1999 Page 15 Pencils by by Lee Weeks, Inks by Dan Green from Incredible Hulk (1962 Marvel 1st Series) Annual 1999 1999 Marvel You might call this page the calm before the storm! In a hard cut from the previous page in this retelling of the Hulk's origin, Bruce Banner had knocked Rick Jones to safety and taken the full brunt of Gamma radiation himself. In the aftermath, both Banner and Jones are returned to base with a furious General Ross demanding answers and Betty attempting to keep the peace. Pencil and ink on Marvel Comics art board. 11" x 17". |

|
Original Art from Invaders #1 (1993) Page 1 Pencils by Dave Hoover, Inks by Brian Garvey from Invaders (1993 Marvel 2nd Series) 1D 1993 Marvel A bold scene-setting first page takes us back to the height of World War 2 where a Nazi sub is set to attack a blacked-out New York City! Thankfully it looks like help is arriving in the last panel! Signed by Hoover in third panel. Pencil and ink on Marvel Comics art board. 11" x 17". |

|
Original Art from Iron Man #211 (1986) Page 8 Pencils by Alex Saviuk, Inks by Sam de la Rosa from Iron Man (1968 1st Series) 211 1986 Marvel With the shocking news that her estranged, drug-addicted husband was still alive, Bethany Cabe sets off to find him in Berlin- and does. Though she may not have gotten the reception she was looking for! Pencil, ink, and screentone on Marvel Comics art board. 11" x 16 1/4". |
|
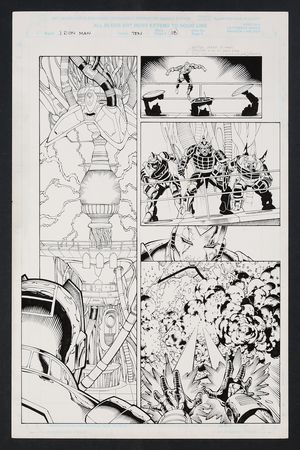
Original Art from Iron Man #10 (1998) Page 18 Pencils by Sean Chen from Iron Man (1998 3rd Series) 10 1998 Marvel While the Avengers and Winter Guard battle the Mandarin's forces outside of his massive dragon ship, Iron Man is in the belly of the beast! Low on power and still reeling from the Mandarin's torture, Tony heads towards the engine room to take the ship down from the inside! A great Iron Man page packed full of tech, well-designed henchmen, and a powerful first-person POV panel of Iron Man pulling an Indiana Jones and taking a kill shot rather than engaging in a protracted battle. Pencil and ink on Marvel Comics art board. 11 1/4" x 17 1/4". NOTE: Multiple inkers are credited for this issue- Larry Stucker and Eric Cannon. |

|
Original Art from John Aman Amazing Man #2 (2014) Page 16 Pencils & Inks by Steven Butler from John Aman Amazing Man (2014 Gallant Comics) 2B 2014 A stunner of a splash page that finds John Aman in his full glory as his explodes out of the roof of an X-Bureau transport and into the sky, deciding to attempt to rescue his kidnapped friend Zoe Henderson without their aid. Signed by Butler in bottom margin. Also included is a copy of the published issue. Pencil and ink on Gallant Comics art board. 12" x 18". |
|
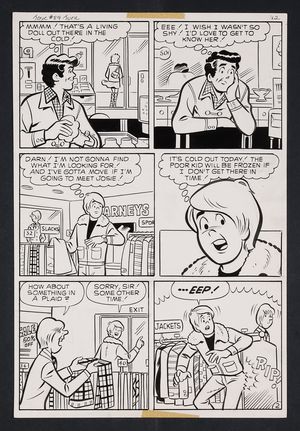
Original Art from Josie and the Pussycats #89 (1976) Page 12 Pencils by Dan DeCarlo, Inks by Jim DeCarlo from Josie and the Pussycats (1963 1st Series) 89 1976 Archie Publications Once again, the universe conspires to keep Josie and Alan M. apart! While Josie waits in the freezing winter for Alan to arrive, the soda jerk takes notice of the 'living doll' standing outside and Alan, anxious to meet her has a pants malfunction. A great page that encapsulates the core drama that's made Archie Comics a mainstay. Pencil and ink on comic art board. 10 1/2" x 16 1/4". |

|
Original Art from Justice League of America #159 (1978 DC), Page 19 Pencils by Dick Dillin and Finishes by Frank McLaughlin from Justice League of America (1960 1st Series) 159 1978 DC Original Art from Justice League of America #159 (1978 DC), Page 19 Pencils by Dick Dillin and Finishes by Frank McLaughlin. In the middle of the annual JLA/JSA meet-up (always a favorite when these two teams get together), the heroes of two worlds are attacked- by DC heroes of the past! As Wonder Woman's invisible jet goes down (after colliding with Viking Prince's flying longboat), the Mighty Amazon finds herself swashbuckling on the wing with The Black Pirate. Also featuring The Flash and Elongated Man, this page is packed full of action and drama, the perfect encapsulation of Bronze Age DC comics! Pencil and ink on DC Comics art board. 15 1/2" x 10 3/4", B&W. Note: Small amount of tape on edges. |
|
Original Art from Justice League of America #190 (1981) Page 2 Pencils by Rick Buckler, Inks by Bob Smith from Justice League of America (1960 1st Series) 190 1981 DC With several of the League's most powerful members now slaves of Starro, the rest of the team readies themselves to head for New York City to hopefully save the day- otherwise the entire city will be destroyed to save the rest of the world! This is a great page with a fun shot of Ralph Dibney elongating himself to join the conversation and a large, haunting panel of the citizens of NYC enslaved by everyone's favorite evil starfish alien! Pencil and ink on DC Comics art board. 10 1/2" x 15 3/4". |

|
Original Art from Justice League of America #243 (1985) Page 12 Pencils by George Tuska, Inks by Mike Machlan from Justice League of America (1960 1st Series) 243D 1985 DC With the rest of the team attempting to stop Amazo as he blazes a path of destruction across the country, Martian Manhunter and Dale Gunn take a trip up North to the Fortress of Solitude to investigate how the adapting android broke loose in the first place. Signed by Tuska in fourth panel. Pencil and ink on DC Comics art board. 11" x 16". NOTE: Page displays some minor staining in the lower right corner. |
|
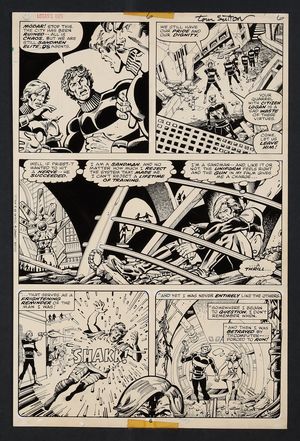
Original Art from Logan's Run #6 (1977) Page 6 Pencils by Tom Sutton, Inks by Terry Austin from Logan's Run (1977 Marvel) 6 1977 Marvel The first issue of the series to move past a direct adaptation of the groundbreaking film picks up in the direct aftermath of the movie's ending, with the City in chaos! The citizens of the City have herded the Sandmen back into the ruins of the dome, giving Logan a moment for reflection. It's a beautifully drawn page with detailed backgrounds, a nice action panel, and clever framing with the last two panels sitting atop a half shot of Logan's head indicating them as memories. Pencil and ink on art board. 10 1/2" x 16". |

|
Original Art from Man-Thing #5 (1980) Page 23 Pencils by Don Perlin, Inks by Bob Wiacek from Man-Thing (1979 2nd Series) 5 1980 Marvel With her family dead and the gang of drug runners chasing her now facing Man-Thing, Barbie Bannister takes her chance to escape the Florida swamps back to civilization. A nice exploitation page here as the injured and traumatized young woman in her underwear presses on through the wilds, observed in the second panel by a phallic voyeur in a nice artistic touch from Perlin. Pencil and ink on Marvel Comics art board. 10 1/2" x 15 3/4". |

|
Original Art from Man-Thing #5 (1980) Page 7 Pencils by Don Perlin, Inks by Bob Wiacek from Man-Thing (1979 2nd Series) 5 1980 Marvel It's almost hard to believe that this made it past the Comics Code! After a short opening scene where Man-Thing discovers the half-dead body of Barbie Bannister in the swamp, we flash back to see how she got there. After convincing her parents to bring a man she met onto their boat, its revealed that he's actually a drug runner- and he's brought the rest of his gang along. A dark, brutal scene unfolds here making this page something of an oddity in the post-Wertham comics world! Pencil and ink on Marvel Comics art board. 10 1/2" x 15 3/4". |
|
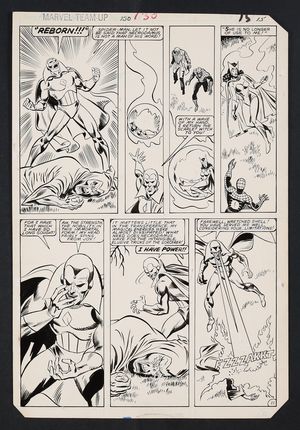
Original Art from Marvel Team-Up #130 (1983) Page 11 Breakdowns by Sal Buscema, Finished Art by Mike Esposito from Marvel Team-Up (1972 1st Series) 130D 1983 A devil's bargain is struck! In order to save the life of his wife The Scarlet Witch, Vision agrees to allow his body to be taken over by the evil Necrodamus. This is a great panel page, beautifully drawn by Buscema and Esposito- especially the maniac glee on the face of "Vision" in panels five and six. Pencil and ink on Marvel Comics art board. 10 3/4" x 16". |
|
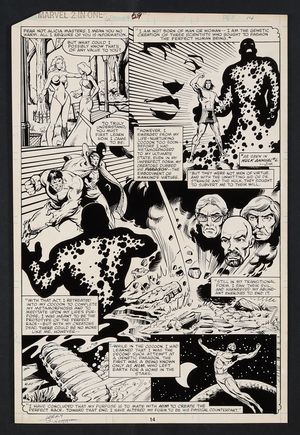
Original Art from Marvel Two-In-One #61 (1980) Page 14 Pencils by Jerry Bingham, Inks by Gene Day from Marvel Two-in-One (1974 1st Series) 61D 1980 A beautiful origin montage page for The Coming of Her (aka Ayesha aka Paragon aka J'Ridia Starduster)! Out on the town with her beau Ben Grimm, Alicia Masters is whisked away by the mysterious being who seeks information thanks to Alicia's previous encounters with Him (aka Adam Warlock). A truly stunning page with an especially eye-catching 'panel' of Paragon's face fading behind action lines as her story begins. Signed by Bingham in lower left margin. Pencil and ink on Marvel Comics art board. 10 1/2" x 16". |

|
Original Art from Mickey Spillane's Mike Danger #10 (1997) Page 2 Pencils by Brad Gorby, Inks by Terry Beatty from Mike Danger (1996 Big) 10 1997 Big Entertainment A fantastic page emblematic of the pulpy energy of Mike Danger as he and a femme fatale slug it out in bed- before he shoots her and she turns to dust! Pencil and ink on Tekno Comix/Big Entertainment art board. 11" x 17". NOTE: Page displays some staining, mostly outside of the art area. |
|
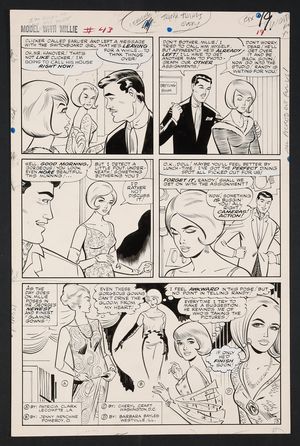
Original Art from Modeling With Millie #43 (1965) Page 19 Pencils by Stan Goldberg, Inks by Dick Ayers from Modeling with Millie (1963) 43 1965 Marvel "Even these gorgeous gowns can't drive the gloom from my heart!" Millie opines as she longs for her long-time photographer Clicker, who's been replaced by an executive's son. A nice fashion panel here with reader designs worked into the story! Pencil and ink on art board. 13 1/2" x 20 1/2". |

|
Original Art from Mystery in Space #5 (2007) Page 9 Pencils by Shane Davis, Inks by Matt 'BATT' Banning from Mystery in Space (2006 2nd Series) 5 2007 DC Undercover on Hardcore Station, Captain Comet investigates the ELC church and their army of cloned psychic assassins- and finds a tank of floating lifeforms who symbiotically attach to the dead of the universe! Pencil and ink on DC Comics art board. 11 1/2" x 17". |
|
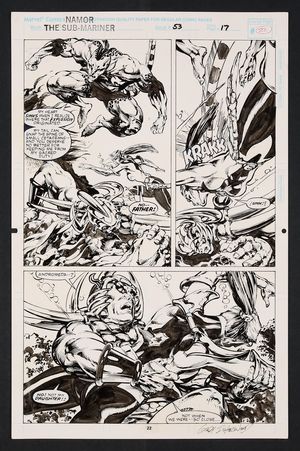
Original Art from Namor the Sub-Mariner #53 (1994) Page 22 Pencils and Inks by Geof Isherwood from Namor the Sub-Mariner (1990 1st Series) 53 1994 A beautiful underwater battle page full of the power and fluidity that only Geof Isherwood can provide! In the frigid waters of Antarctica, Attuma and his bastard daughter Andromeda face off with the deadly Sea Leopard and despite her strained relationship with her father, she lunges into the path of Leopard's tail to save him. Signed by the artist in lower margin. Pencil and ink on Marvel Comics art board. 11" x 17". |
|
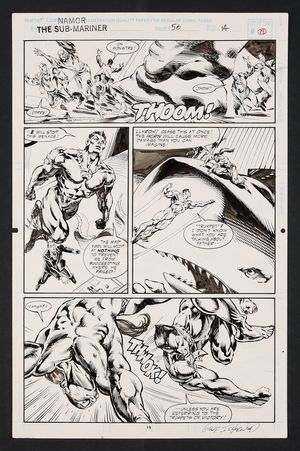
Original Art from Namor the Sub-Mariner #56 (1994) Page 19 Pencils and Inks by Geof Isherwood from Namor the Sub-Mariner (1990 1st Series) 56 1994 Marvel Summoned by the Horn of Proteus (which you may have seen Doom tooting in a classic panel from Spidey Super Stories), a giant sea beast attacks the United Nations! To make things even worse, Namor's also got to contend with his "son" Llyron who has staged the attack to make Namor look like he's returned to his villainous ways. A great page from Isherwood who does a brilliant job depicting the scale of the battle with the massive beast alongside close, powerful panels of the two men fighting in its wake. Signed by the artist in lower margin. Pencil and ink on Marvel Comics art board. 11" x 17". |
|
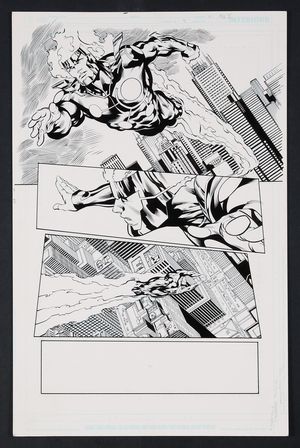
Original Art from Futures End #5 (2014) Page 11 Printed Pencils by Jesus Merino, Inks by Dan Green from New 52 Futures End (2014 DC) 11 2014 DC Though most heroes are having some trouble in this future-set series, things are looking good for Firestorm! With Ronnie Raymond in the driver's seat, Firestorm heads home from a night at the Playboy mansion and finds that his other (better?) half Jason Rusch isn't very talkative. A big, bold hero shot of Firestorm soaring over the streets of NYC opens this great showcase page for the molecule-manipulating hero. Well, half of Firestorm anyway. Ink over printed pencils on DC Comics art board. 11" x 17". |
|
Original Art from Futures End #16 (2014) Page 11 Printed Pencils by Jesus Merino, Inks by Dan Green from New 52 Futures End (2014 DC) 16 2014 DC A great action page that sees Rampage...on a rampage! Of course, a little thing like that isn't going to stop Lois Lane from doing her job, though she might need some Super assistance to stay alive. Green's inking shines here, especially in the 3/4 splash packed with weight and detail. Ink over printed pencils on DC Comics art board. 11" x 17". |
|
Original Art from Futures End #31 (2015) Page 19 Printed Pencils by Jesus Merino, Inks by Dan Green from New 52 Futures End (2014 DC) 31 2015 DC Five Years From Now! Here we check in with Firestorm, now Madison Payne with Jason Rusch trapped in her head, as the pair attend the funeral of previous Firestorm Ronnie Raymond from afar. Ink over printed pencils on DC Comics art board. 11" x 17". |
|
Original Art from Futures End #31 (2015) Page 20 Printed Pencils by Jesus Merino, Inks by Dan Green from New 52 Futures End (2014 DC) 31 2015 DC At the funeral of former Firestorm Ronnie Raymond, the new Firestorm Madison Payne (with Jason Rausch still along for the ride) takes a special interest in one attendee- her boyfriend Cal Corcoran, better known as Tim Drake! A beautifully laid out page emphasizing the distance between the two as Tim believes Madison to have died in the explosion that made her Firestorm. Ink over printed pencils on DC Comics art board. 11" x 17". |

|
Original Art from New Mutants #29 (1985), Page 17 by Bill Sienkiewicz from New Mutants (1983 1st Series) 29D 1985 Marvel Original Art from New Mutants #29 (1985), Page 17 by Bill Sienkiewicz. Kidnapped and whisked away to battle to the death in the Mutant Arena, Sunspot's cries of anger are answered- by Axe! Sienkiewicz' talents are on full display in this bold, action-packed panel page. Signed by Sienkiewicz in bottom left. Pencil and ink on Marvel Comics art board. 11" x 17", B&W. |

|
Original Art from Normandy Gold #1 (2017) Page 16 Pencils and Inks by Steve Scott from Normandy Gold (2017 Titan) 1A 2017 Titan The 1970's setting of this conspiracy noir come to beautiful life thanks to Scott's knack for fashion and detail. Signed by the artist in bottom margin. Pencil and ink on art board. 11" x 17". |
|
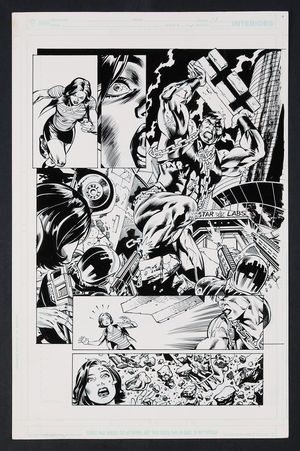
Original Art from Outsiders #16 (2004) Page 9 Pencils by Dan Jurgens, Inks by Nelson from Outsiders (2003-2007 3rd Series) 16 2004 DC A phenomenal, heroic entrance into battle for Metamorpho! With Grace blasted out of the battle by one of the cyber-suited gang members the Outsiders are taking on, it's time for the Element Man to bat cleanup, and he's got a lot of targets to choose from. Jurgens and Nelson make a fantastic art team with great action storytelling and beautiful inks- especially on Metamorpho in the large central panel. Pencil and ink on DC Comics art board. 11 1/2" x 17". |

|
Original Art from Over the Edge #4 (1996) Page 14 Pencils by Robert Brown, Specific Inker Not Credited from Over the Edge (1995) 4 1996 Marvel A wonderful example of 90's tacti-cool as the Ghost Rider Task Force gears up and moves out once again to go after the bike-bound demon who has supposedly gone on a bombing spree in Brooklyn! The specific inker for this page is not credited, but the list of inkers credited with work on this issue is: Tom Palmer, Brad Vancata, Bud LaRosa, and Mike Witherby. Pencil and ink on Marvel Comics art board. 11" x 17 1/4". NOTE: One word balloon is missing from the page, second panel "Once and for all, like the commish says." |
|
Original Art from Planet of the Apes #5 (2002) Page 16 Pencils by Adrian Sibar, Inks by Norman Lee from Planet of the Apes (2001 Dark Horse) 5A 2002 Dark Horse A dramatic moment as a human tribal meeting seeks to determine the fate of a pair of renegade apes! Signed by Lee in lower right margin. Pencil and ink on Dark Horse comic art board. 11 1/2" x 17 1/2". |
|
Original Art from Planet of the Apes #5 (2002) Page 18 Pencils by Adrian Sibar, Inks by Norman Lee from Planet of the Apes (2001 Dark Horse) 5A 2002 Dark Horse The tribal meeting to determine the fate of two renegade apes who aided in the escape of humans has come to its end as the humans prepare to vote- via throwing knives! Signed by Lee in lower right margin. Pencil and ink on Dark Horse comic art board. 11 1/2" x 17 1/2". |

|
Original Art from Red Tornado #2 (2009) Page 3 Pencils by Jose Luis, Inks by JP Mayer from Red Tornado (2009 DC 2nd Series) 2 2009 DC A great action page that sees everyone's favorite red robot taking on...The United States Air Force over Pearl Harbor? Having parsed the clues, Red Tornado has just found his long lost 'sister', a water elemental named Red Torpedo. Unfortunately, due to some past events, the military isn't too fond of unidentified flying objects around this particular base! Pencil and ink on DC Comics art board. 11 1/2" x 17", B&W. |
|
Original Art from Robin #2 (1991) Page 16 Pencils by Tom Lyle, Inks by Bob Smith from Robin (1991 Limited Series) 2 1991 DC Robin's trip to Paris has been anything but romantic as he finds himself constantly besieged by a gang known called the Ghost Dragons, led by Sir Edmund- also known as King Snake! Here we see King Snake laying down the law on his lackeys as they have once again failed in bringing down the Boy Wonder and his companions. Signed by the artists in lower margin. Pencil and ink on DC Comics art board. 11 1/2" x 16 1/2". |
|
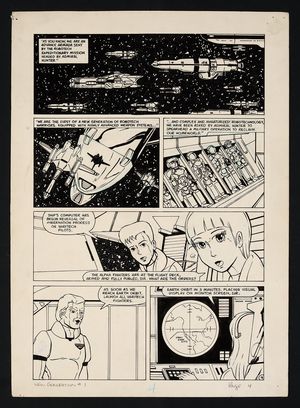
Original Art from Robotech The New Generation #1 (1985) Page 4 Pencils by Reggie Byers, Inks by Tom Poston from Robotech The New Generation (1985) 1 1985 Comico A tense, scene-setting page for this chapter in the Robotech saga as members of the REF head back to Earth to combat a surprise Invid invasion. A solid page from the series that shows off the REF fleet and armored soldiers preparing for combat. Pencil and ink on art board. 12" x 16 3/4". NOTE: There is a piece of masking tape on the reverse of the piece that notes that this page was drawn by Neil Vokes, however neither the credits in the issue itself nor the issue's entry in the Grand Comics Database credit Vokes with any work on this issue. |

|
Original Art from Savage Avengers #3 (2022) Page 20 by Carlos Magno from Savage Avengers (2022 Marvel) 3A 2022 Marvel A phenomenal last-page splash reveal! With the Savage Avengers shanghaied back to the Hyperborean age by Deathlok alongside Conan, the team faces a tough battle in getting back to their time- a battle they nearly win before Thulsa Doom's interference gives Deathlok a chance to escape. On this gorgeous final page, we see an injured Deathlok beginning to remember his pre-undead-cyborg life...as Miles Morales! Pencils are on paper, inked art is done over printed pencils on art board. Both measure 11 3/4" x 16 1/2". |
|
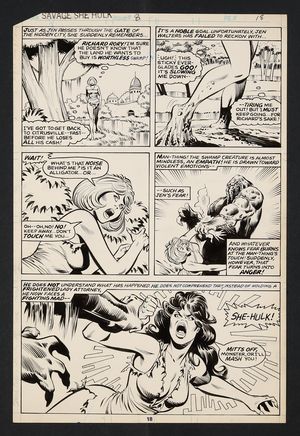
Original Art from Savage She-Hulk #8 (1980) Page 18 Breakdowns by Mike Vosburg, Finishes by Chic Stone from Savage She-Hulk (1980) 8 1980 Marvel An absolutely fantastic Shulkie page featuring the Man-Thing! Captured by a mysterious pair of beings and taken to a hidden city built around the fountain of youth that also flattened human emotion, Jen Walters used her legal know-how to convince the society that what they had wasn't truly living. Expelled from the secret hideway, she wanders the swamps of Florida only to find herself in the clutches of the Man-Thing. While Jennifer Walters may know fear, the Savage She-Hulk does not and some green on green violence is imminent! Pencil and ink on Marvel Comics art board. 10 1/2" x 15 3/4". |

|
Original Art from Savage She-Hulk #15 (1981) Page 1 Pencils by Mike Vosburg, Inks by Frank Springer from Savage She-Hulk (1980) 15 1981 Marvel A not-so-savage opening page that finds Shulkie in fine form! It's rare that a Hulk gets to enjoy some R&R and Jen is making the most of it here, stealing away to her boyfriend Zapper's parents' beach house for a day of surf and sand. Vosburg and Springer make for a solid art team with great layouts and beautiful inkwork from Springer- especially on the engine of Zapper's dune buggy and Shulkie's figure in the last panel. Also included is a copy of the published issue. Pencil and ink on Marvel Comics art board. 16 1/2" x 10 3/4". |

|
Original Art from Secret Origins #34 (1988), Page 18 by Alan Weiss with Inks by Joe Rubinstein from Secret Origins (1986 DC 2nd Series) 34 1988 DC Original art from Secret Origins #34 (1988), page 18 by Alan Weiss with inks by Joe Rubinstein. Captain Atom's entry to the DC Universe came as the Cold War was winding down and thus necessitated a new origin- one that was a bit more cynical. On this final page of his Secret Origins story, we see a cabal of military and private interests discussing the cover story for this new origin around a table featuring a model of the 'classic' Captain Atom, beautifully emphasized in the final panel. Pencil and ink on DC Comics art board. 10 1/4" x 16", B&W. Includes a copy of the original issue. |
|
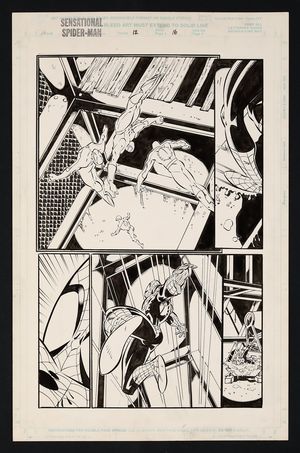
Original Art from Sensational Spider-Man #12 (1997) Page 16 Pencils by Josh Hood, Inks by John Lowe In auction ending July 15 from Sensational Spider-Man (1996 1st Series) 12 1997 Marvel One of the first issues to come out in the wake of the 'Revelations' story which saw Ben Reilly revealed to be the clone after giving his life to save Pete, the true Spider-Man is back in the saddle! He's...a bit rusty though. Tracking down the Trapster, Pete finds himself falling right into the villain's trap as his arachno-batics are no match for a greasy steel beam! Pencil and ink on Marvel Comics art board. 11" x 17". |
|
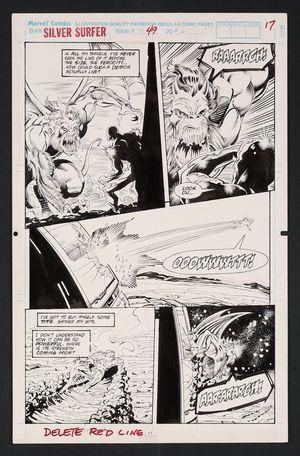
Original Art from Silver Surfer #49 (1991) Page 17 Pencils by Ron Lim, Inks by Tom Christopher from Silver Surfer (1987 2nd Series) 49 1991 Marvel As the Surfer races across the universe to warn earth of Thanos' plans (which would come to a head in a little story called The Infinity Gauntlet!) he's waylaid by a ferocious beast. Once a small monkey-like creature, Thanos used the Infinity Gauntlet to transform it into a powerful monster and set it after the Surfer. A thrilling page from Lim and Christopher who do a great job of depicting the power and ferocity of the creature, making him a real threat for the Surfer. Pencil and ink on Marvel Comics art board. 11" x 17 1/4". |
|
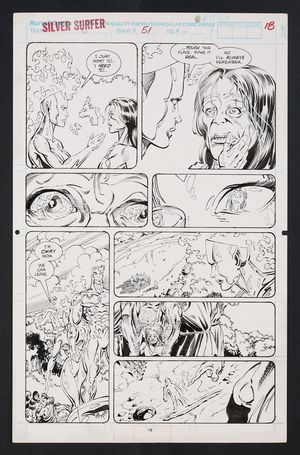
Original Art from Silver Surfer #51 (1991) Page 18 Pencils by Ron Lim, Inks by Tom Christopher from Silver Surfer (1987 2nd Series) 51D 1991 Marvel In the midst of the massive cosmic event known as The Infinity Gauntlet, a moment of reflection for the Herald of Galactus! After being sent to find sustenance for her master, Nova thinks back on a journey Silver Surfer once took her on where they encountered a planet home to a primitive race. While Nova initially dismisses their existence as meaningless, he takes her into a cave on where she realizes that the planet she's on is Earth in the distant past. It's a charged moment as Nova begins to understand why the Surfer would rebel against Galactus and that the Great Power she's been imbued with comes with an even Greater Responsibility. Lim captures this moment beautifully here, with the third and fourth panels being especially poignant Pencil and ink on Marvel Comics art board. 11" x 17 1/4". |
|
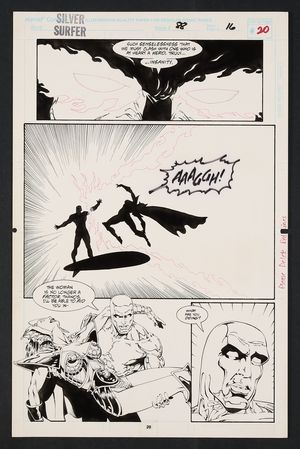
Original Art from Silver Surfer #88 (1994) Page 16 Pencils by Andy Smith, Inks by Tom Christopher from Silver Surfer (1987 2nd Series) 88 1994 Marvel A beautiful page that sees the end of Silver Surfer's fight with Valkyrie! As a maddened Thor takes on Thanos, Valkyrie attempts to keep the Silver Surfer busy- though not for long as he unleashes a massive energy blast in the stunning second panel. He's a bit broken up about it though. Pencil and ink on Marvel Comics art board. 11" x 17". |
|
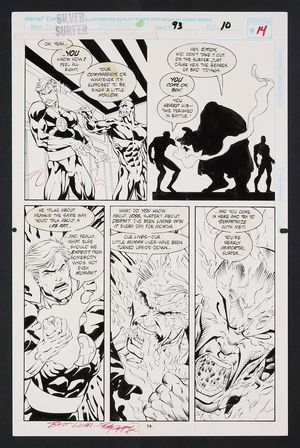
Original Art from Silver Surfer #93 (1994) Page 14 Pencils by Bart Sears, Inks by Ray Kryssing from Silver Surfer (1987 2nd Series) 93 1994 Marvel Well, that's what happens when you show up unexpectedly! On earth for the wedding of Rick Jones, the Surfer decides to pay a visit to his old pals the Fantastic Four and they're...feeling not so good. Reed is believed dead, Sue is deeply in mourning, Ben is horribly scarred, and Johnny is reeling from learning that he married a Skrull. So it's the perfect time for Surfer to break the news that Frankie Raye aka Nova is dead. It's a great page with some eye-catching beats like Ben's massive silhouette and of course the three large panels of Johnny beginning to Flame On as his (misplaced) anger at the Surfer grows. Signed by Kryssing in lower margin. Pencil and ink on Marvel Comics art board. 11" x 17". |
|
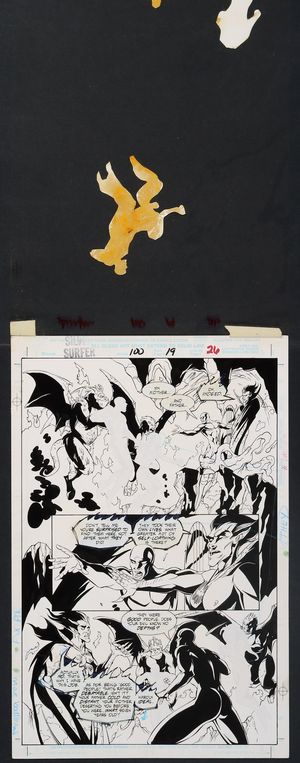
Original Art from Silver Surfer #100 (1995) Page 19 Pencils by Joe Phillips, Inks by Bob Almond from Silver Surfer (1987 2nd Series) 100A.D 1995 Marvel Trapped in Mephisto's realm and battling for possession of his very soul, you'd think things couldn't get any worse for Silver Surfer in his landmark 100th issue. You would be wrong. As Mephisto shows the Surfer the countless souls trapped in this hell, he focuses in on two in particular- Norin Radd's mother and father! This page is also a fun artifact of pre-digital comic creation with the figures of Surfer's parents drawn into the original art, photocopied, and covered up on the page with the copies cut out, and placed on a translucent overlay so that they could be rendered in negatives for the finished art. Pencil and ink on Marvel Comics Art board with translucent overlay featuring stat images. 11 1/4" x 17 1/4". |
|
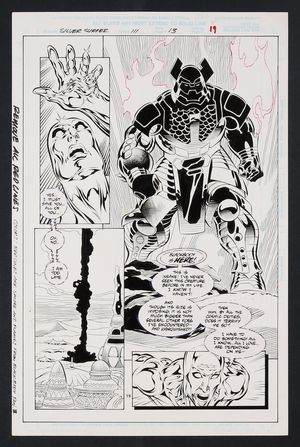
Original Art from Silver Surfer #111 (1995) Page 19 Pencils by Tom Grindberg, Inks by Bill Anderson from Silver Surfer (1987 2nd Series) 111 1995 Marvel A fantastic villain debut for this first issue in a 'bold new era of greatness' for the Silver Surfer! After interfacing with a drone controlled by the mysterious Uwir Prin, the Surfer finds himself on his home planet of Zenn-La with his friends and allies all around. Unfortuantely, they're all terrified of 'Blackbody' who the Surfer meets on this powerful page! Pencil and ink on Marvel Comics art board. 11 1/4" x 17 1/4". |

|
Original Art from Solo Ex-Mutants #3 (1988) Page 18 Pencils by Myke Maldonado, Inks by Jimmy Palmiotti from Solo Ex-Mutants (1988) 3 1988 Eternity After a solo trek into the wasteland to clear her mind, Ex-Mutant Angie finds herself the captive of a horde of mutants intent on making her the bride of their leader! Pencil, ink, and screentone on DC Comics art board. 11 1/4" x 16 3/4". |
|
Original Art from Spectre #23 (2003) Page 7 Pencils by Norm Breyfogle, Inks by Dennis Janke In auction ending July 15 from Spectre (2001 4th Series) 23 2003 DC Stigmonius and Materna face off as the villain's plan is set fully into motion! A fantastically drawn page with clear action amidst a decidedly trippy setting. Signed by Breyfogle in lower margin. Pencil and ink on DC Comics art board. 11" x 17". |
|
Original Art from Spectre #25 (2003) Page 3 Pencils by Norm Breyfogle, Inks by Dennis Janke In auction ending October 14 from Spectre (2001 4th Series) 25 2003 DC The DEO's Agent Franco is tracking the monstrous meta known as Rabid as he tears across the country- but is there more to this than just another rampaging brute? Breyfogle and Janke present this scene nicely with the zoom in on on the ghostly image of The Spectre visible in the broken glass behind Rabid. Signed by Breyfogle in lower margin. Pencil and ink on DC Comics art board. 11" x 17". |

|
Original Art from Spider-Man The Mutant Agenda #1 (1994) Page 20 Pencils by Scott Kolins, Inks by Sam de la Rosa from Spider-Man The Mutant Agenda (1994) 1 1994 Marvel An extremely cool Spider-Man origin page from comics veterans Scott Kolins and Sam de la Rosa that sees Peter meditating on the circumstances that led to his powers as he tours Brand conference. Signed by Kolins in bottom left. Also included is a copy of the published issue. Pencil and ink on Marvel Comics art board with acetate overlay. 11" x 17". |

|
Original Art from Spirits of Vengeance #2 (2024) Page 13 Inks by Roberto Poggi, Printed Pencils by Chris Campana from Spirits of Vengeance (2024 Marvel) 2A 2024 Marvel While Atlantis may be one of the last places you'd expect to find someone with a flaming head, the Ghost Rider must go where vengeance is needed! In this case, an innocent soul is trapped in Atlantis' most remote penal colony and after a long trek, Ghost Rider has come face to face with the warden- who gets a penance stare when he proves uncooperative! Ink over printed pencils on Marvel Comics art board. 11" x 17". |

|
Original Art from Stuff Of Legend Vol. 2, #1 Page 18 by Charles Paul Wilson III from Stuff of Legend The Jungle (2010 Th3rd World Studios) 1A 2010 Th3rd World Studios Original Art from Stuff Of Legend Vol. 2, #1 Page 18 pencils by Charles Paul Wilson III. There are few things more villainous than making ominous small talk over a war map covered in models, and that's where we find the Boogeyman, not-so-subtly threatening his very worried General. Pencil on art board. 14" x 11", B&W. |

|
Original Art from Supervillain Team-Up #10 (1977), Page 11 by Bob Hall with Inks by Don Perlin from Super-Villain Team-Up (1975) 10 1977 Marvel Original art from Supervillain Team-Up #10, page 11 by Bob Hall with inks by comic veteran Don Perlin. This stunning 3/4 splash page features Namor in all his glory- graceful, determined, and of course surly. The striking posing almost overtakes the background visage of Atlantis, still showing the scars from Dr. Doom's attack in a previous issue. Pencil, ink, and screentone on Marvel Comics art board. 10 1/2" x 15 3/4", B&W. Also includes a copy of the original issue. |
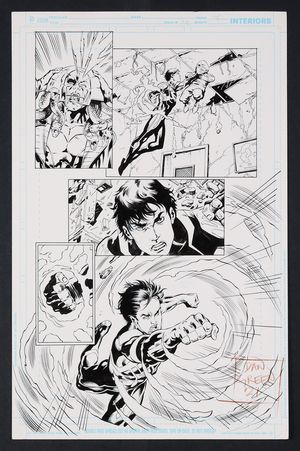
|
Original Art from Superboy #24 (2013) Page 15 Printed Pencils by Robson Rocha, Inks by Dan Green from Superboy (2011 5th Series) 24 2013 DC A great page that gets to the root of the New 52 iteration of Superboy! A confrontation with Psycho Pirate reveals to Kon-El that his supposed ally Dr. Psycho has been manipulating Kon to his own ends. As an experimental combination of Kryptonian and human DNA created by N.O.W.H.E.R.E., this hits Superboy right in the guy and he takes immediate action against his former 'friend'- but is that just Psycho Pirate's influence? The eye is immediately drawn to the fantastic half splash of Superboy throwing the first punch in this battle, but be sure to take note of Green's incredible inking skills giving and incredible amount of texture and depth to the Psycho Pirate! Signed by Green in lower right. Ink over printed pencils on DC Comics art board. 11" x 17". |
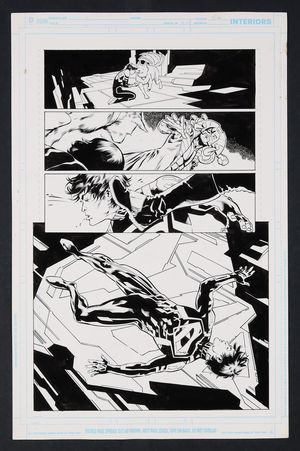
|
Original Art from Superboy #24 (2013) Page 20 Printed Pencils by Robson Rocha, Inks by Dan Green from Superboy (2011 5th Series) 24 2013 DC A great last page cliffhanger! Awaking in the aftermath of a massive battle with Dr. Psycho, Superboy finds himself alone and powerless- and at the mercy of Psycho Pirate! In addition to the large closing image of an unconscious Superboy, we get some great small touches like a happy Krypto with his tail wagging wildly and a clear look at Psycho Pirate's well-designed helmet which is rendered with a translucent effect in the published issue, losing a lot of the great detail. Ink over printed pencils on DC Comics art board. 11" x 17". |
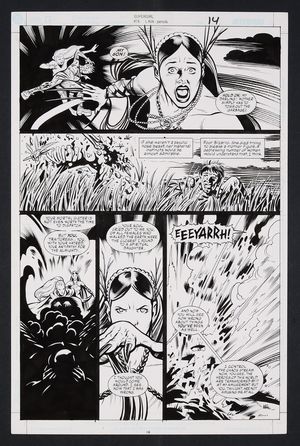
|
Original Art from Supergirl #74 (2002) Page 14 Pencils by Leonard Kirk, Inks by Robin Riggs from Supergirl (1996 3rd Series) 74 2002 DC A beautifully drawn page with bold clean inks from the midst of Linda Danvers' showdown with Lilith! Perfectly laid out by veteran Kirk, we get some fantastic imagery here, especially in the second panel as a severely battle-damaged Linda looks over at the decaying bones of what was just her Bizarro! Pencil and ink on DC Comics art board. 11" x 17". |

|
Original Art from Superman #6 (1987), Page 20 by John Byrne with Inks by Karl Kesel from Superman (1987 2nd Series) 6D 1987 DC Original Art for Superman #6 (1987) page 20 by fan-favorite John Byrne and inks by Karl Kesel. This battle page from part two of the story "The Last Five Hundred" sees a stubble-bearing Man of Steel fighting off the villainous robot Host as a possessed Lois Lane looks on and gives orders to Host! Byrne's talent for expressive faces is beautifully displayed in the second panel as the possessed Lois realizes that Superman can fly. Pencil and ink on art board. 16 1/2" x 11 1/4", B&W. Includes a copy of the original issue. |
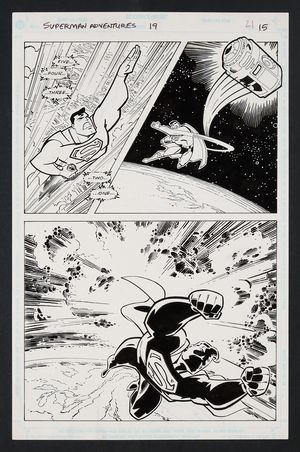
|
Original Art from Superman Adventures #19 (1998) Page 15 Pencils by Aluir Amancio, Inks by Terry Austin from Superman Adventures (1996) 19 1998 DC You almost couldn't ask for a more iconic Superman scene than the Man of Steel speeding upward into space to dispose of an atomic bomb with only seconds to spare! The beautifully executed top panels give way to a stunner of a half splash as Superman triumphantly flies away from a nicely rendered explosion which of course has a bit of Kirby Krackle to it! Blue line and standard pencil and ink on DC Comics art board. 11" x 17". |
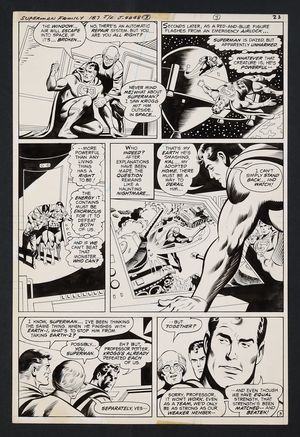
|
Original Art from Superman Family #187 (1978) Story Page 3 Pencils by Curt Swan, Inks by Jack Abel from Superman Family (1974) 187 1978 DC Earth-1 and Earth-2 collide! Attempting to travel to Earth-1 to save the life of his Jimmy Olsen, Superman-2 is waylaid by the powerful alien warrior Krogg- who has also beaten the Superman of Earth-1! On this fantastic page, we see Superman-2 rescue Superman-1 as the pair begin to regroup. Pencil and ink on comic art board. 10 1/2" x 15 1/2". |
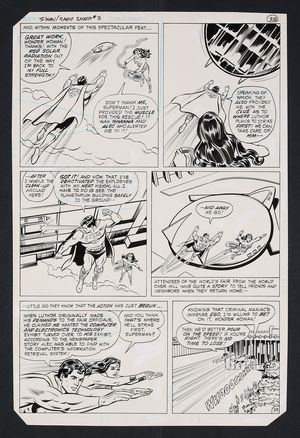
|
Original Art from Superman in The Computer Masters of Metropolis (1982) Radio Shack Page 28 Pencils by Curt Swan, Inks by Frank Chiaramonte from Superman Radio Shack Giveaway (1980) 3 1982 DC The World's Fair has come to Metropolis and of course, trouble abounds! Lex Luthor, furious about being rejected from the fair, traps Superman in the planetarium which he's rigged up with red sun generators to trap the Man of Steel. Thankfully Superman is able to contact Wonder Woman for help (through the Computer Whiz Kids!) who arrives to just pick up the entire building with her lasso! A great page from legendary Superman artist Swan and his regular inker at the time Chiaramonte. Pencil and ink on comic art board. 10 1/2" x 16". |
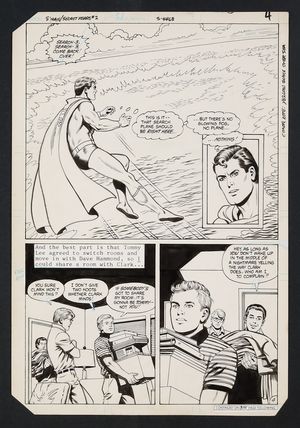
|
Original Art from Superman The Secret Years #2 (1985) Page 4 Pencils by Curt Swan, Inks by Kurt Schaffenberger from Superman The Secret Years (1985) 2 1985 DC A downright iconic image from two of the greats finds Superman investigating the mysteries of the Bermuda Triangle in the tremendous half splash that opens this page. Meanwhile, back at Metropolis U, Clark Kent's roommate drama heats up. It ain't easy bein' super! Pencil and ink on DC Comics art board. 11" x 16". |
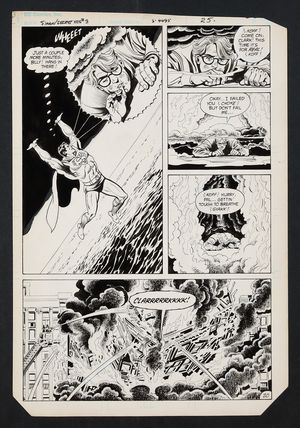
|
Original Art from Superman The Secret Years #3 (1985) Page 20 Pencils by Curt Swan, Inks by Kurt Schaffenberger from Superman The Secret Years (1985) 3 1985 DC Superman faces the trolley problem in this thrilling and beautifully drawn page from this series set during his college years! While in the process of saving an island full of people from an incoming tidal wave, he hears the signal whistle he gave to his roommate Billy who (this time anyway) is in imminent danger. A great image of Superman in the first panel using his telescopic vision while carrying an island is the centerpiece to this page, but make sure to take note of Schaffenberger's beautiful rendering on the smoke! Pencil and ink on DC Comics art board. 11" x 16 1/4". |
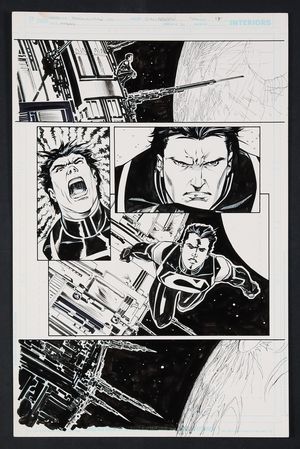
|
Original Art from Teen Titans Annual #2 (2013) Page 17 Printed Pencils by Barry Kitson, Inks by Dan Green from Teen Titans (2011 4th Series) Annual 2 2013 DC A nice spotlight page for the New 52 iteration of Superboy, Kon-El, as he does some space-brooding outside the former JLA satellite in a dark future he and his teammates have been thrown into- superhero problems! Beautiful work from Kitson and Green here, both in the expressive closeups on Kon and on the gorgeously inked satellite exterior. Ink over printed pencils on DC Comics art board. 11" x 17". |
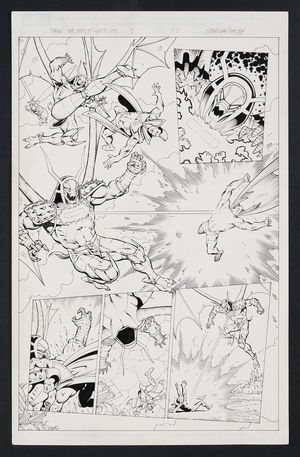
|
Original Art from Thanos: The Infinity Relativity (2015) Page 42 Pencils by Jim Starlin, Inks by Andy Smith from Thanos The Infinity Relativity HC (2015 Marvel) 1-1ST 2015 Marvel Two of the most powerful beings in the Marvel Universe collide in the gladiatorial arena of New Kral in this fantastic, frenetic fight page from Marvel's actual cosmic king Jim Starlin! Though the advertised fight was Adam Warlock vs. the Annihilation Wave, the Shi'ar don't take kindly to Annihilus's incursion into the posiverse and the mighty Gladiator leaps into the fray! Pencil and ink on Marvel Comics art board. 11" x 17 1/4". |
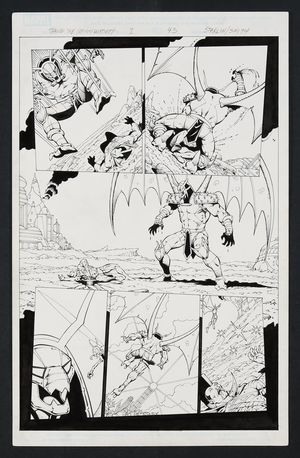
|
Original Art from Thanos: The Infinity Relativity (2015) Page 43 Pencils by Jim Starlin, Inks by Andy Smith from Thanos The Infinity Relativity HC (2015 Marvel) 1-1ST 2015 Marvel A terrifying glimpse at the power of Annihilus, ruler of the Negative Zone, as he absolutely dismantles one of the toughest beings in the Marvel Universe- Gladiator of the Shi'ar Imperial Guard! It's a brutal page, particularly in the second panel as blood flies through the air while Annihilus hacks at the Shi'ar bruiser with his claws. Pencil and ink on Marvel Comics art board. 11" x 17 1/4". |
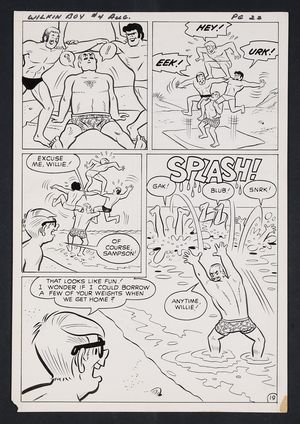
|
Original Art from That Wilkin Boy #4 (1969) Page 19 Pencils by Dan DeCarlo, Inks by Rudy Lapick from That Wilkin Boy (1969) 4 1969 Archie Publications Though Archie's line was all about the teens, this story finds the adults getting in on some of the fun as Willie Wilkin and and Sampson Smythe (fathers of Bingo and Samantha) ditch the rugrats and try to find some peace and quiet on the beach. Unfortunately, the Muscle Beach Boys have come to cause some trouble! Thankfully, Sampson has some true strength to show them in this hilarious partial splash page! Pencil and ink on comic art board. 11" x 15 3/4". |
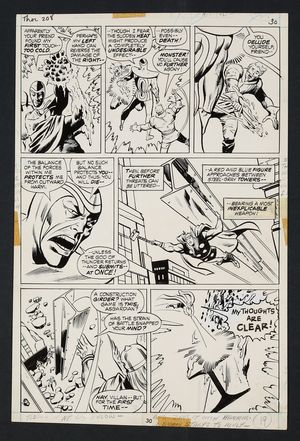
|
Original Art from Thor #208 (1973) Page 30 Pencils by John Buscema, Inks by Vince Colletta from Thor (1962 Marvel 1st Series Journey Into Mystery) 208 1973 Marvel It's All Asgardian Action in the Big Apple as Thor and the Warriors Three take on Mercurio! Some wonderful imagery here, particularly in the first panel as Mercurio first freezes Hogun's weapon and arm before rapidly heating it to a red hot state and in the fourth panel as Thor reenters the fray wielding a massive steel girder which he uses in an ingenious manner. Pencil and ink on Marvel Comics art board. 10 3/4" x 16". |
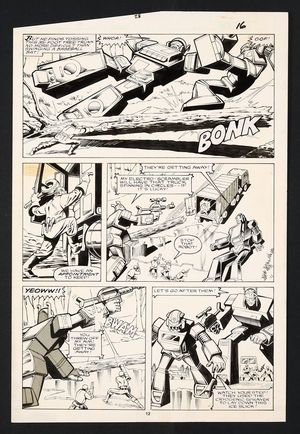
|
Original Art from Transformers #28 (1987) Page 12 Pencils by Don Perlin from Transformers (1984 Marvel) 28D 1987 Marvel The Autobots have been burgled! Nestor Forbes, now known as the mechanic has made off with several pieces of Cybertronian tech and has attracted the attention of not only the Autobots, but the US Military as well- who cause plenty of trouble for Blaster and Goldbug even though they're on the same side. Pencil, ink, and screentone on Marvel Comics art board. 11" x 16 1/2". NOTE: One word balloon stat "Get in the back, Juan!" is missing from panel 2. The credited inkers for this issue are Ian Akin and Brian Garvey. |
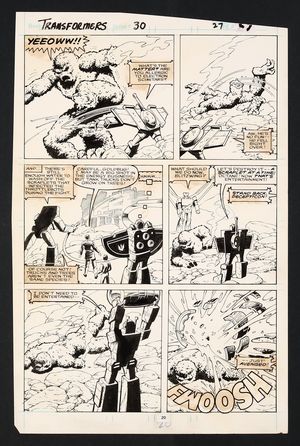
|
Original Art from Transformers #30 (1987) Page 20 Breakdowns by Don Perlin from Transformers (1984 Marvel) 30 1987 Marvel The final blow is struck against the Scraplets- though not by the Decepticons who are taking joy in slowly killing the small, infections creatures. A great action page that shows off the rich design of the combined Scraplet-creature! Pencil and ink on Marvel Comics art board. 11: x 16 3/4". NOTE: Artists credited with finishes for this issue are Ian Akin and Brian Garvey. |
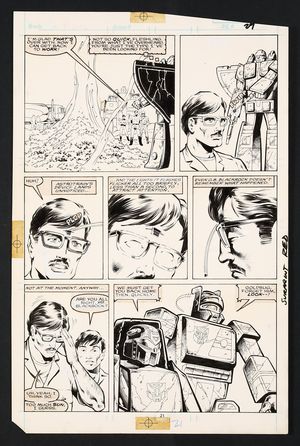
|
Original Art from Transformers #30 (1987) Page 21 Breakdowns by Don Perlin from Transformers (1984 Marvel) 30 1987 Marvel Though the Autobots and Decepticons both fought against the threat posed by the Scraplets, the rival factions' warring agendas reemerge immediately as Astrotrain implants some sort of device on G.B. Blackrock's head! Pencil and ink on Marvel Comics art board. 11: x 16 3/4". NOTE: Artists credited with finishes for this issue are Ian Akin and Brian Garvey. |

|
Original Art from Ultimate Avengers #4 (2010) Story Page 19 Pencils by Carlos Pacheco, Inks by Dexter Vines from Ultimate Avengers (2009) 4 2010 Marvel After (barely) taking down a rogue Captain America, the Ultimate Avengers (Nick Fury, Dr. Gregory Stark, Hawkeye, Black Widow II, Wasp II) and Nerd Hulk gather to lick their wounds and prepare for their next mission- taking on AIM to stop them from building a Cosmic Cube! Pencil and ink on Marvel Comics art board. 11" x 17 1/4". |

|
Original Art from Veronica #80 (1998) Page 29 Pencils by Jeff Shultz, Inks by Rich Koslowski from Veronica (1989 Archie) 80 1998 Archie Publications Veronica's tennis prowess is on full display in this fantastic page that sees her outgunning everyone she knows and needing professional help to find a new challenger. Pencil and ink on Archie Comics art board. 11 1/2" x 17 1/2". |

|
Original Art from The Walking Dead #105 (2012) Page 22 Pencils and Inks by Charlie Adlard from Walking Dead (2003 Image) 105 2012 Image A Nice 3/4 splash caps off this issue of Walking Dead that, while not Negan's first appearance, is entirely devoted to him and in which he receives most of the dialogue. It's an incredible showcase for one of the great villains of the modern age as he leads the recently captured Carl around his compound, giving him and the reader a chilling view of the smiling sadism that makes him such an icon. Pencil and ink on Image Comics art board. 8 1/2" x 14". Word balloon stats are attached to a transparent overlay which is affixed with tape on the rear of the page. |

|
Original Art from War of the Gods #3 (1991 DC), Page 10 Layouts by George Perez (Inker(s) Not Specifically Credited from War of the Gods (1991) 3A 1991 DC Original Art from War of the Gods #3 (1991 DC), Page 10 Layouts by the late, great George Perez (Inker(s) Not Specifically Credited). With the world under siege by every pantheon of gods, Black Adam and the Suicide Squad have (kind of) teamed up to take the fight to the real threat- Wonder Woman's foe, the evil Circe. This page is quintessential Black Adam as his offer to Amanda Waller of a team-up was merely a ploy to create a distraction so that he could win the day himself. The last panel features Teth-Adam in a powerful hero pose, smashing his way through the creatures protecting their sorceress! Pencil and ink on DC Comics art board. 11 1/2" x 16 1/2", B&W. Note: Small glue stain in last panel due to missing caption box stat. |
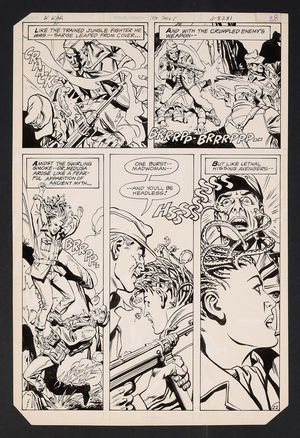
|
Original Art from Weird War Tales #115 (1982) Page 22 Pencils and Inks by Fred Carillo from Weird War Tales (1971 DC) 115 1982 DC An incredible Creature Commandos page and specifically a great spotlight for Medusa! After the Commandos' leave in Scotland is rudely interrupted by a Nazi assault squad looking to assassinate a British royal, the team leaps into action with Medusa loosing her lethal locks on a kraut who thinks he has the jump on her. Pencil and ink on DC Comics art board. 10 1/2" x 16". |

|
Original Art from Weird Western Tales #65 (1980) Page 29 Pencils by Dick Ayers, Inks by Romeo Tanghal from Weird Western Tales (1972 1st Series) 65 1980 DC A grim but ultimate hopeful final page to this story about the madness of war! Ke-Woh-No-Tay (better known as Scalphunter) and his new travelling companion have been saved from a crazed Confederate soldier by a bolt of lightning- one that also shocked his ally into his right mind as he throws down his gun and abandons the bloodlust that had gripped them. Pencil and ink on comic art board. 10 1/2" x 15 3/4". |

|
Original Art from Western Action #1 (1975) Story Page 8 Pencils by Jack Abel, Inks by Al Milgrom from Western Action (1975 Atlas) 1 1975 Atlas You can't ask for a better western page than this- an old fashioned saloon brawl that explodes through the window and out into the street with action in every panel! The Comanche Kid, after saving a young boy whose home had been attacked by bandits, heads into town looking for the culprits and spots them roughing up the girls at the local watering hole- time for some frontier justice! Pencil and ink on comic art board. 10 1/2" x 15 3/4". |

|
Original Art from What If? #37 (1982 Marvel), Page 2 Pencils by Arvell Jones and Inks by Sam de la Rosa from What If (1977 1st Series) 32 1982 Marvel Original Art from What If? #37 (1982 Marvel), Page 2 Pencils by Arvell Jones and Inks by Sam de la Rosa (of Venom fame!) The ever-lovin' blue-eyed Thing is the focus of this What If? tale, as thanks to MODOK he's infected with a virus that continues to mutate. This jam packed page is full of details that don't pop as well in the finished issue, especially the use of screen tone on the cell in panel two, and the beginnings of Ben's mutations in panel five making this piece something really special to behold. Pencil, ink, and screen tone on Marvel Comics art board. 11" x 16", B&W. Note: Panel three has been cut out and pasted back in to conform to the editor's note of placing the caption box at the bottom- an excellent decision as it would have bled into MODOK's sdialogue! |

|
Original Art from Graphic Storytelling and Visual Narrative (1996) Page by 10 Will Eisner from Will Eisner Graphic Storytelling and Visual Narrative SC (1996 Pourhouse Press) 1-1ST 1996 The legendary Will Eisner's mastery of sequential art is illustrated (both figuratively and literally) on this page with a simple but beautiful example of how the medium of comics works. Pencil and ink on art board. 10 1/2" x 14". |

|
Original Art from Graphic Storytelling and Visual Narrative (1996) Page 9 by Will Eisner from Will Eisner Graphic Storytelling and Visual Narrative SC (1996 Pourhouse Press) 1-1ST 1996 A true master of sequential art, Will Eisner's instructional/theory works are required reading not only for artists but fans as well. This chapter title page from early in the book features a beautifully drawn single image filled with Eisner's beautiful inks. The central image is pencil and ink on art board which has been pasted into the larger page from the back. Text is a stat, but the graph is hand drawn. 10 1/2" x 14". |
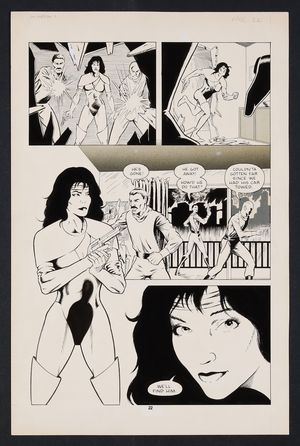
|
Original Art from Windsor #1 (1992) Page 22 Pencils and Inks by Craig Miller In auction ending July 15 from Windsor (1992) 1 1992 A great story page by Miller here with a nicely flowing layout, his trademark clean figure work, and great linework in closeup final panel. Pencil and ink on art board. 11 1/2" x 17 1/2". |
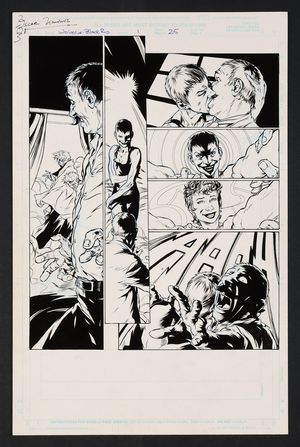
|
Original Art from Wolverine: Black Rio #1 (1998) Page 25 Pencils by Oscar Jimenez, Inks by Eduardo Alpuente from Wolverine Black Rio (1998) 1 1998 Marvel A great horror page as Wolverine and his detective pal Antonio are confronted by the vampire Ezra Shaw- who it turns out is Antonio's supposedly dead wife! Signed by Jimenez in top left margin. Pencil and ink on Marvel Comics art board. 11 1/4" x 17 1/4". |
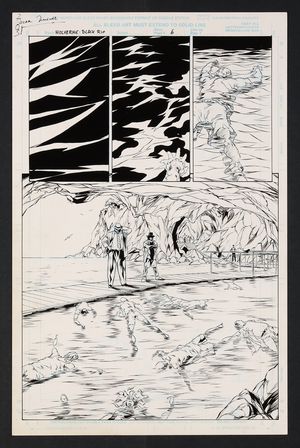
|
Original Art from Wolverine: Black Rio #1 (1998) Page 6 Pencils by Oscar Jimenez, Inks by Eduardo Alpuente from Wolverine Black Rio (1998) 1 1998 Marvel It's Carnaval and everyone's favorite clawed-Canadian is in Rio- though not to celebrate (even if he is wearing his vacation shorts here)! This grim half splash sets the story into full gear as Wolverine and old pal Antonio, now a detective, examine a grisly crime scene. Signed by Jimenez in top left margin. Pencil and ink on Marvel Comics art board. 11 1/4" x 17 1/4". |

|
Original Art from World's Finest #271 (1981) Page 31 Pencils by Rich Buckler, Inks by Frank McLaughlin from World's Finest Comics (1941) 271 1981 DC In celebration of 200 issues of Batman/Superman team-ups (the first 71 issues of WF only featured the two in separate stories), this Roy Thomas-penned tale finds the pair reflecting on their earliest meetings as they engage in a lengthy battle with Atoman. This fantastic page revisits Superman #76 where the two are thrust together in strange circumstances. The highlight here is the dramatic final panel which mirrors one from the original story as the two change into their costumes with Batman in shadow and Superman bathed in light! Pencil and ink on DC Comics art board. 10 1/2" x 15 3/4". |

|
Original Art from X-51 #8 (2000), Page 18 Pencils by Joe Bennett Inks by Bob Wiacek from X-51 (1999) 8 2000 Marvel Original Art from X-51 #8 (2000), Page 18 Pencils by Joe Bennett, Inks by Bob Wiacek. If you want an action page, it's hard to do better than this one which sees X-51 (better known as Jack Kirby's Machine Man!) taking on Wolverine, Kitty Pryde, and Jubilee! A dynamic series of panels fill this page with thrilling vignettes from the battle- Wolverine getting clobbered out of frame, Kitty barely phasing through a powerful punch, and Jubilee blasting the robot with her pyrotechnics to little avail. Pencil and ink on Marvel Comics art board. 11" x 17 1/4", B&W. |
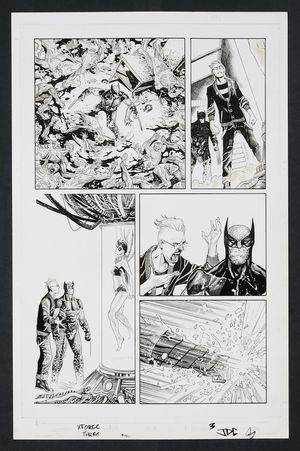
|
Original Art from X-Force #3 (2020) Page 3 Pencils and Inks by Joshua Cassara from X-Force (2020 Marvel) 3A 2020 Marvel Though the Krakoan Age was heaven for many mutants, X-Force was (as usual) in the muck! Tracking down the mercenaries responsible for an assault on the Mutant paradise, Wolverine and Kid Omega find themselves in a massive biolab surrounded by half-formed soldiers and a captive Domino- and they are NOT happy about it. A great page that really captures the essence of this series with plenty of gore and an impassioned argument over the morality of this new age. Cassara's work is rich, full of detail and texture thanks to his combination of intricate linework and shading added with alcohol markers. Signed by Cassara in lower margin. Pencil and ink on art board. 11" x 17". |
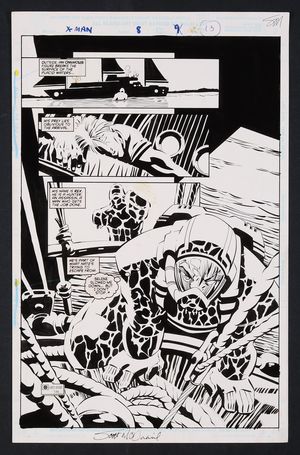
|
Original Art from X-Man #8 (1995) Page 13 Pencils by Scott McDaniel, Inks by Mike S. Miller from X-Man (1995 Marvel) 8 1995 Marvel After losing Madelyne Pryor to the machinations of Selene and with Sugar Man on his trail, Nate Gray takes the only logical step and heads out to sea taking a job as a deckhand on a private yacht. Unfortunately, trouble isn't far behind as the assassin Rex boards the boat in the dead of night! A wonderful showcase for McDaniel's signature style as his bold, blocky figures and fantastic use of negative space give this page the perfect atmosphere. Pencil and ink on Marvel Comics art board. 11" x 17 1/4". |

|
Original Art from X-Men Adventures Season II #12 (1995) Page 22 Pencils by John Herbert, Inks by Greg Adams from X-Men Adventures (1994 Marvel) Season II 12 1995 Marvel On a walkabout in the Savage Land, Professor Xavier and Magneto have formed a fragile alliance with Ka-Zar as the trio head towards Magneto's former citadel to confront the new master of the mutates and hopefully rescue Shanna! A beautiful page with a fantastic, panel-breaking hero shot of Ka-Zar and Zabu leaving the depowered mutant leaders to fend for themselves. Signed by Herbert in top margin. Pencil and ink on Marvel Comics art board. 11" x 17". |

|
Original Art from X-Men Manifest Destiny: Nightcrawler #1 (2009) Page 28 Inks by Vicente Cifuentes, Printed Pencils by Ardian Syaf from X-Men Manifest Destiny Nightcrawler (2009) 1 2009 Marvel After leaving the X-Men and heading back to his home town in Germany, Nightcrawler learns that, sadly, patterns repeat themselves. After failing to reach a teenager who was cursed and turned into a 'monster', Mephisto shows up to rub some salt in the wound but thankfully this only strengthen's Kurt's resolve to do the right thing. Ink over printed pencils on art board. 11 3/4" x 15 1/2". |
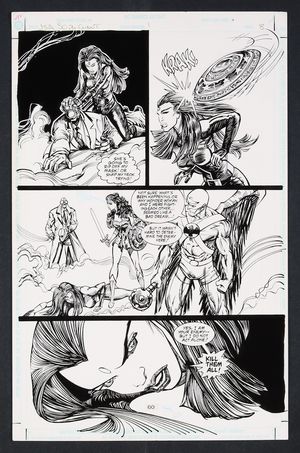
|
Original Art from All Star Comics 80-Page Giant (1999) Page 60 Pencils by Denys Cowan, Inks by John Floyd 1999 DC Kali Gari, the Nazi Dream Assassin, has the upper hand on Sandman when, KRAK! A well-placed shield strike from the rear by Wonder Woman, freed from her visions causing her and Hawkman to battle each other. The fight is on now- and Kali has brought friends! A nice panel page with great shots of our three heroes. Pencil and ink on DC Comics art board. 11" X 17". |
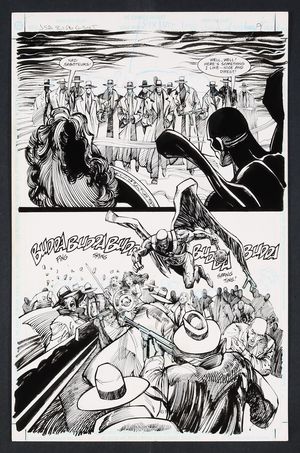
|
Original Art from All Star Comics 80-Page Giant (1999) Page 61 Pencils by Denys Cowan, Inks by John Floyd 1999 DC Kali Gari, The Nazi Dream Assassin is after the JSA- and she's brought a horde of Nazi saboteurs with her! It's up to Wonder Woman and Hawkman to take on this troupe of terror and Hawkman is more than ready to jump into action as shown in the fantastic half splash. Beautiful work from longtime collaborators Cowan and Floyd here! Pencil and ink on DC Comics art board. 11" X 17". |
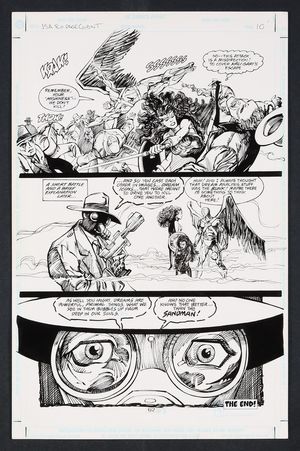
|
Original Art from All Star Comics 80-Page Giant (1999) Page 62 Pencils by Denys Cowan, Inks by John Floyd 1999 DC As the battle ensues Sandman realizes this is all a distraction for Kali Gari Nazi Dream Assassin to make her escape. With everything sorted out, Sandman takes a moment to wax poetic about the world of dreams and a beautifully drawn closeup panel that closes the story. Pencil and ink on DC Comics Art board. 11" X 17". NOTE: The Kali Gari figure in panel two is a pasted-in printed stat. |

|
Original Art from Batman #572 (1999) Page 16 Pencils by Damion Scott, Inks by John Floyd 1999 DC One of the more unique subplots in the epic No Man's Land Event, Two-Face's obsession with and kidnapping of Renee Montoya continues to play out here as Renee discusses the situation with her also-captive parents. Some great framing here from Scott who parallels Two-Face's split personalities with Renee positioned between her parents whose opinions on the matter somewhat differ. Pencil and ink on DC Comics art board. 11 1/4" X 17". |
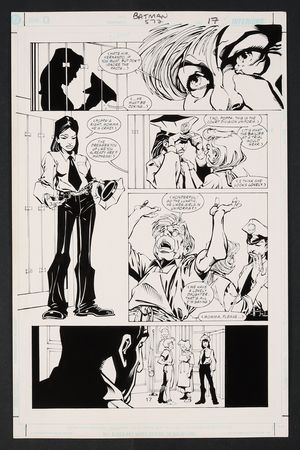
|
Original Art from Batman #572 (1999) Page 17 Pencils by Damion Scott, Inks by John Floyd 1999 DC The Montoya family's saga as prisoners of Two-Face begin to come to a head as Renee's parents watch her don the blues once more at Harvey's behest, though they're not the ones she's used to wearing. Does Two-Face just like his girls in uniform like Renee's father thinks, or is there more to this dastardly divided deviant's scheme? Pencil and ink on DC Comics art board. 11 1/4" X 17". |
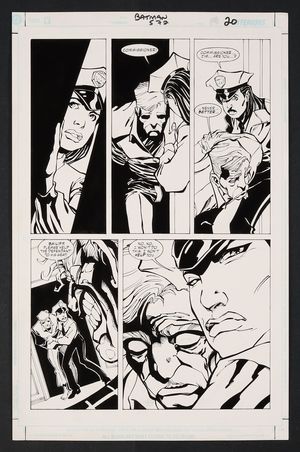
|
Original Art from Batman #572 (1999) Page 20 Pencils by Damion Scott, Inks by John Floyd 1999 DC The psychological thriller that is the Renee Montoya and Two-Face subplot of No Man's Land comes to a head here as the defendant for Two-Face's trial is revealed to be none other than Commissioner Jim Gordon! Pencil and ink on DC Comics art board. 11 1/4" X 17". |
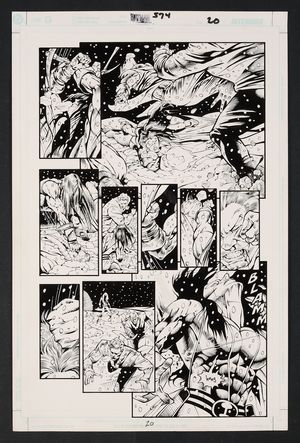
|
Original Art from Batman #574 (2000) Page 20 Pencils by Dale Eaglesham, Inks by John Floyd 2000 DC It may be the end of the road for Huntress! After losing her mantle as Batgirl and fighting a crazed ex-GCPD officer and his militia she's just sent an army of Joker's goons running. Just when it looks like she's won, BLAMM, a gunshot from The Joker hits her in the side. Pencil and ink on DC Comics art board. 11 1/4" X 17". |
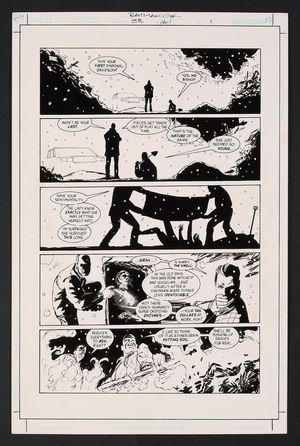
|
Original Art from Batman Gotham Knights #38 (2003) Page 1 Pencils by Roger Robinson, Inks by John Floyd 2003 DC A grim opening page as two shadowy figures casually dispose of a body- though judging by the "--your tax dollars at work, huh?" line these aren't your run of the mill Gotham criminals! Pencil and ink on DC Comics art board. 11 1/4" X 17". |
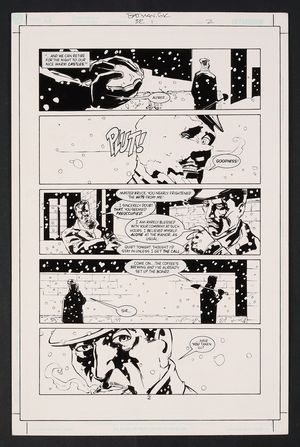
|
Original Art from Batman Gotham Knights #38 (2003) Page 2 Pencils by Roger Robinson, Inks by John Floyd 2003 DC Something is amiss at Wayne Manor! It appears that Bruce Wayne is...playing around and having fun? It's a quiet night in Gotham so Bruce has apparently decided to stay in and spend some time with his oldest friend, though Alfred has some doubts. Pencil and ink on DC Comics art board. 11 1/4" X 17". |
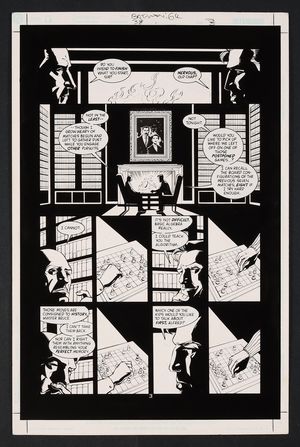
|
Original Art from Batman Gotham Knights #38 (2003) Page 3 Pencils by Roger Robinson, Inks by John Floyd 2003 DC Surprising both Alfred and the reader, Bruce Wayne has decided to have a quiet evening at home with his trusty butler playing chess. Of course, as in most fiction chess isn't just chess as Alfred makes the true opening move and asks Bruce which of the 'kids' he wants to talk about first. Pencil and ink on DC Comics art board. 11 1/4" X 17". |
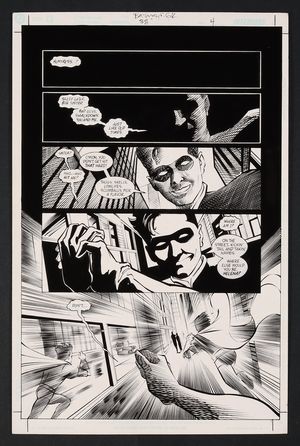
|
Original Art from Batman Gotham Knights #38 (2003) Page 4 Pencils by Roger Robinson, Inks by John Floyd 2003 DC A hard cut from the cozy scene in Wayne Manor's library to Huntress' disoriented POV as she's awoken in the middle of some kind of action by Robin. Robinson and Floyd do a fantastic job depicting her discombobulated state of mind with the heavy crosshatching on Robin coming into focus and then an abundance of motion lines as she's thrust into action. Pencil and ink on DC Comics art board. 11 1/4" X 17". |
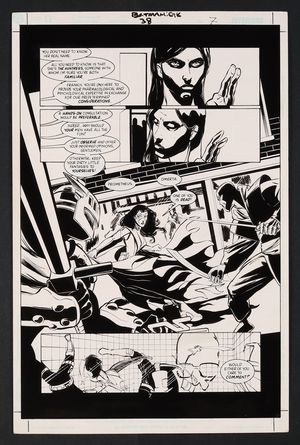
|
Original Art from Batman Gotham Knights #38 (2003) Page 7 Pencils by Roger Robinson, Inks by John Floyd 2003 DC Huntress's drug induced psychosis while under observation by Checkmate continues as visions of Prometheus and Omerta appear to attack her while the unseen voices continue to observe her from behind the glass. Pencil and ink on DC Comics art board. 11 1/4" X 17". |
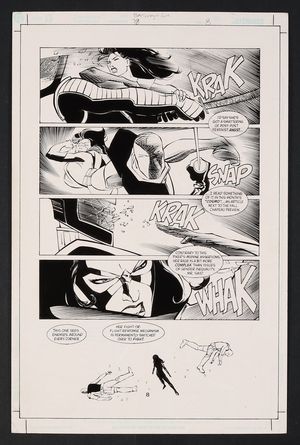
|
Original Art from Batman Gotham Knights #38 (2003) Page 8 Pencils by Roger Robinson, Inks by John Floyd 2003 DC Trapped in a padded cell and heavily drugged by Checkmate, Huntress brutally takes out two security guards who she thinks are Omerta and Prometheus as the still unseen observers offer their commentary through mirrored glass. A great fight page that contrasts well with the almost meta dialogue from those watching her. Pencil and ink on DC Comics art board. 11 1/4" X 17". |
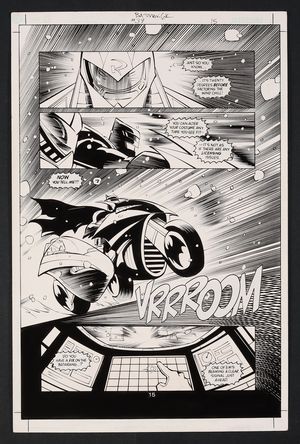
|
Original Art from Batman Gotham Knights #39 (2003) Page 15 Pencils by Roger Robinson, Inks by John Floyd 2003 DC As a great man once said, "Where does he get those wonderful toys?" A great page that showcases Batman's sleek Batcycle as the Caped Crusader and Boy Wonder (Tim Drake) speed through the city to track down a wayward Batarang. Pencil and ink on DC Comics art board. 11 1/4" X 17". |
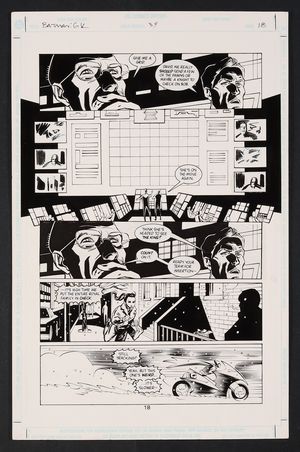
|
Original Art from Batman Gotham Knights #39 (2003) Page 18 Pencils by Roger Robinson, Inks by John Floyd 2003 DC Storylines converge on this page as we see Checkmate tracking Helena Bertinelli, the Huntress, after her 'escape' from their facility while in the last panel, Batman and Robin continue to track down wayward Batarangs...once of which is in Helena's possession! Pencil and ink on DC Comics art board. 11 1/4" X 17". |

|
Original Art from Batman Gotham Knights #39 (2003) Page 22 Pencils by Roger Robinson, Inks by John Floyd 2003 DC A fantastic cliffhanger splash as Checkmate has finally tracked down the Dark Knight thanks to a tracking device inserted into Huntress when she was in their custody. Robinson and Beatty make great use of negative space here, cutting through the murk of the sewer tunnel that leads to the Batcave with large blank areas depicting the harsh glow of the Checkmate operatives' tactical flashlights. Pencil and ink on DC Comics art board. 11 1/4" X 17". |
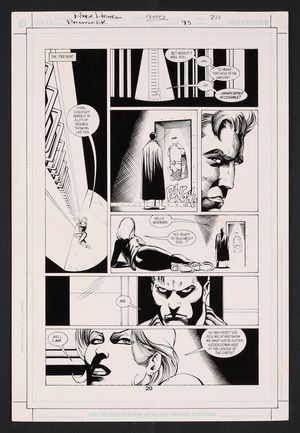
|
Original Art from Batman Gotham Knights #43 (2003) Page 20 Pencils by Roger Robinson, Inks by John Floyd 2003 DC An absolutely brilliant page from this story about Jason Todd's death coming back to haunt Batman! As Bruce moodily ponders his shrine to Jason Barbara Gordon appears behind him, sandwiching Bruce between the consequences that come with allowing others to put on the mask. Robinson and Floyd are firing on all cylinders here from the blocking and framing of the scene to the expressive faces on our heroes. Pencil and ink on DC Comics art board. 11 1/4" X 17". |
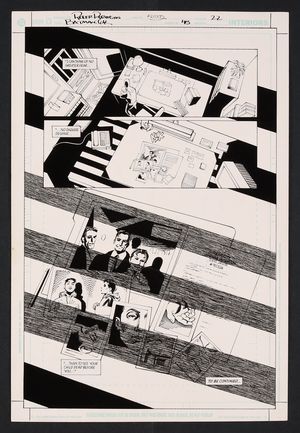
|
Original Art from Batman Gotham Knights #43 (2003) Page 22 Pencils by Roger Robinson, Inks by John Floyd 2003 As the captions continue Barbara Gordon's words to Bruce about whether he was a good 'father' to Jason, we cut to a wonderfully noir-infused scene of the evidence collected by the police officer looking into Bruce Wayne's possible involvement in Jason's death. Pencil and ink on DC Comics art board. 11 1/4" X 17" |
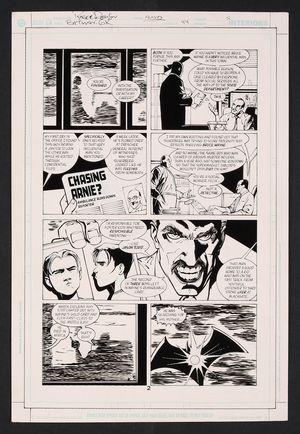
|
Original Art from Batman Gotham Knights #44 (2003) Page 2 Pencils by Roger Robinson, Inks by John Floyd 2003 DC Facing pressure from his boss, the detective looking into odd behavior surrounding Bruce Wayne pushes back with some (circumstantial in our opinion!) evidence about the billionaire. Little does he know that the man himself is listening to the entire conversation! Pencil and ink on DC Comics art board. 11 1/4" X 17". |
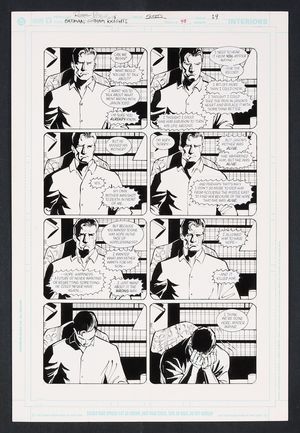
|
Original Art from Batman Gotham Knights #45 (2000) Page 19 Pencils by Roger Robinson, Inks by John Floyd 2000s In a very emotional scene we see Bruce Wayne begin to break down as he recounts his failings that led to the death of Jason Todd to a social services investigator who's taken an interest in the case. Robinson and Floyd do a great job of capturing the emotional weight of this scene as Bruce doesn't tell any of the usual playboy billionaire cover up stories but instead opens up and gives his honest view on his greatest failure in an eight panel, slow motion breakdown. Pencil and ink on DC Comics art board. 11 1/2" X 17". |
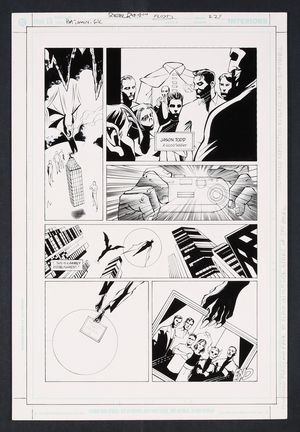
|
Original Art from Batman Gotham Knights #45 (2003) Page 22B Pencils by Roger Robinson, Inks by John Floyd 2003 DC A page that doesn't exist...kind of! The final three pages of this issue were heavily edited down to two with the only surviving parts of this page being panel two and a portion of panel four. This was likely done to bring down the page count, although it's possible editorial was concerned about the security lapse here as Man-Bat and his son Aaron leave the cave with a framed photo of the entire Bat-family out of costume and in the cave! Pencil and ink on DC Comics art board. 11 1/2" X 17". |
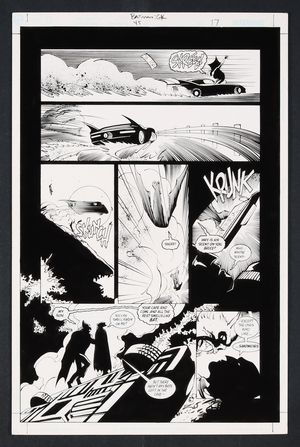
|
Original Art from Batman Gotham Knights #45 (2003) Page 17 Pencils by Roger Robinson, Inks by John Floyd 2003 DC A nice action page as Batman finds himself in the market for a new car thanks to the surprise appearance of Man-Bat! Searching for his missing son, Man-Bat helps Bruce connect some dots- his suit is covered with Langstrom's son's scent and the sandwiches Alfred leaves out in the cave have begun to go missing. Could there be an extra bat in the Batcave? Pencil and ink on DC Comics art board. 11" X 17". |
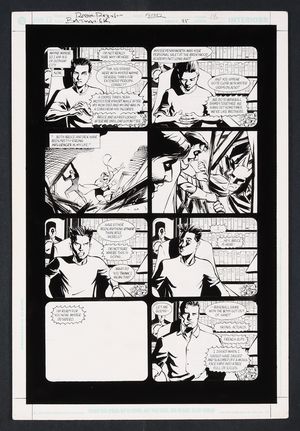
|
Original Art from Batman Gotham Knights #45 (2003) Page 18 Pencils by Roger Robinson, Inks by John Floyd 2003 DC Tensions are high at Wayne Manor as a social services investigator has been looking into the death of Jason Todd, necessitating interviews with Bruce's other wards. Here, it's Tim Drake's turn and just as the (then) youngest Robin begins to lose his cool, Bruce unexpectedly arrives cool as ever in the face of the increasingly aggressive questioning. Pencil and ink on DC Comics art board. 11 1/2" X 17". |
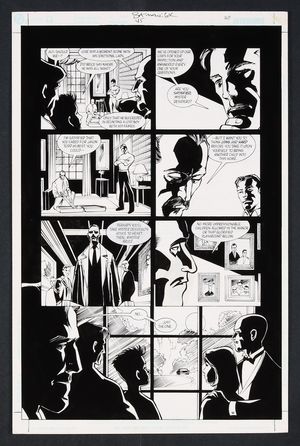
|
Original Art from Batman Gotham Knights #45 (2003) Page 20 Pencils by Roger Robinson, Inks by John Floyd 2003 DC With social services' investigation into the death of Jason Todd complete, the assembled Bat-family of Bruce, Alfred, Dick, Tim, and Cass breathe a sight of relief. We also get an apocryphal declaration that "no more impressionable children allowed in the manor of that glorified playground below". Pencil and ink on DC Comics art board. 11" X 17". |
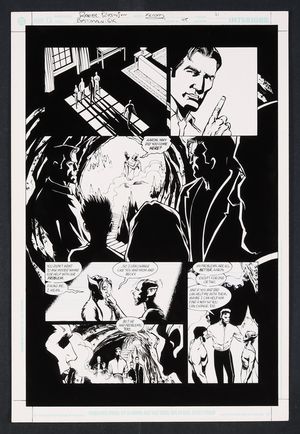
|
Original Art from Batman Gotham Knights #45 (2003) Page 21 Pencils by Roger Robinson, Inks by John Floyd 2003 DC Father and son are reunited as Kirk Langstom (Man-Bat) and his son Aaron talk in the Batcave about why he ran away. It's happy families all around as the now-cleared-of-suspicion-in-the-death-of-Jason-Todd Batfam joins them. Pencil and ink on DC Comics art board. 11 1/2" X 17". NOTE: This page was edited for publication with the first two panels removed and the rest of the page shifted up to accommodate the addition of three panels from the next page, which was also edited in a similar manner. |
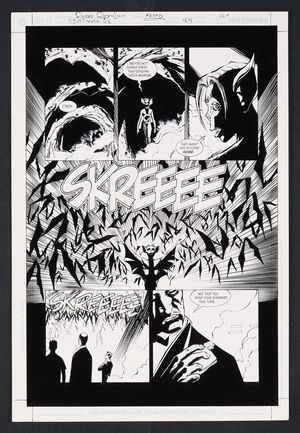
|
Original Art from Batman Gotham Knights #45 (2003) Page 22A Pencils by Roger Robinson, Inks by John Floyd 2003 DC A happy ending! With Bruce Wayne no longer being investigated in the death of Jason Todd and Kirk Langstrom reunited with his son Aaron, it's time for a celebration as Aaron returns the bats to the Batcave (they were chased out when Alfred was quarantined in the cave with a variant of the Clench). It is a joyous reunion capped off with the delightful touch of Alfred getting a big glob of guano right on his shoulder. Pencil and ink on DC Comics art board. 11 1/2" x 17". NOTE: This page was edited for publication with the top three panels being moved to the previous page and two panels from the next page added in at the bottom here. |
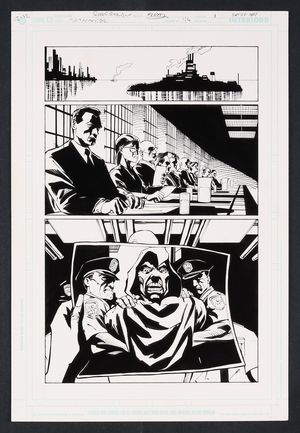
|
Original Art from Batman Gotham Knights #46 (2003) Page 1 Pencils by Roger Robinson, Inks by John Floyd 2003 DC We open this issue at Blackgate Penitentiary, which is only Gotham's *second* most dangerous and breakout prone detention facility! Valentin Kalibanicz aka The Spook is up for parole after serving a term of eight years. Has this master escape artist finally reformed or is there something more going on? Pencils and ink on DC Comics art board. 11 1/2" X 17". |
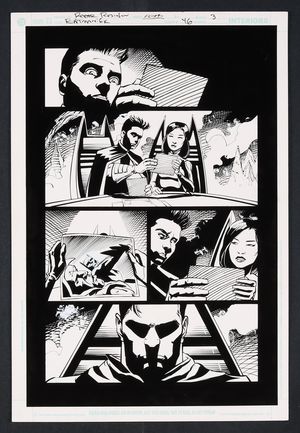
|
Original Art from Batman Gotham Knights #46 (2003) Page 3 Pencils by Roger Robinson, Inks by John Floyd 2003 DC A bit of levity here as the Bat-family gathers for a 'staff meeting' with Tim and Cass admiring some action shots of the subject at hand while Bruce makes a rare joke- though you might not be able to tell by his face. Pencil and ink on DC Comics art board. 11 1/2" X 17". |
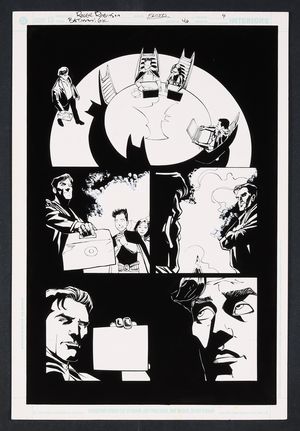
|
Original Art from Batman Gotham Knights #46 (2003) Page 4 Pencils by Roger Robinson, Inks by John Floyd 2003 DC Its an all hands on deck meeting and Dick brought the Donuts! A great bit of family dynamics here as the eldest son clarifies to Tim and Cass that Batman is trolling them and a great dip into the cartoony in panel two as Time eyes the snacks. Some great old-school smoke effects here, contrasting nicely with the almost mundane 'staff meeting' vibe of the conference table setting. Pencil and ink on DC Comics art board. 11 1/2" X 17". |
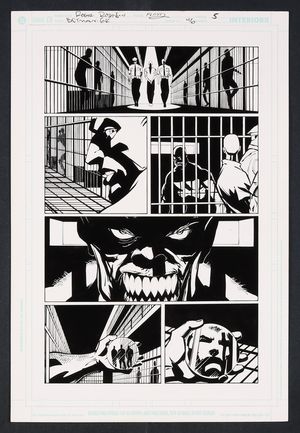
|
Original Art from Batman Gotham Knights #46 (2003) Page 5 Pencils by Roger Robinson, Inks by John Floyd 2003 DC On his finale walk back to his cell in Blackgate after a successful parole hearing, The Spook is confronted by another prisoner who...politely requests that he use his newfound freedom to do what none of them are able to take down the Bat. Kinda seems like a bad idea if you ask me. Pencil and ink on DC Comics art board. 11 1/2" X 17". |
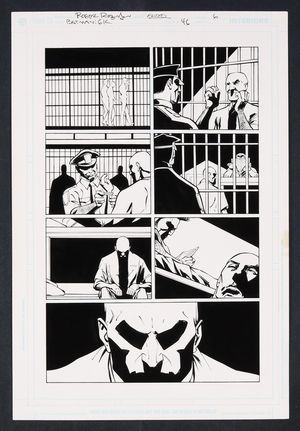
|
Original Art from Batman Gotham Knights #46 (2003) Page 6 Pencils by Roger Robinson, Inks by John Floyd 2003 DC The Spook, having just been cleared for parole, returns to his cell for his final night in Blackgate Penitentiary. After charming the guards a little bit, Spook has a chat with his cellmate Johnny LaMonica (Black Spider) responding to LaMonica's question as to why he never escaped his current detention with the cryptic answer of "Johnny, some prisons are inescapable." Pencil and ink on DC Comics art board. 11 1/2" X 17". |
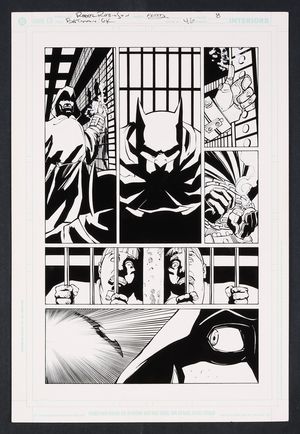
|
Original Art from Batman Gotham Knights #46 (2003) Page 8 Pencils by Roger Robinson, Inks by John Floyd 2003 A tale as old as time! While the villain monologues about how much better they are the, hero slips their ties and saves the day. A dramatic, exciting page with cameos from Tweedledee and Tweedledum who have had enough experience with the Bat that they know what's coming for The Spook. Pencil and Ink on DC Comics art board. 11 1/2 X 17". |
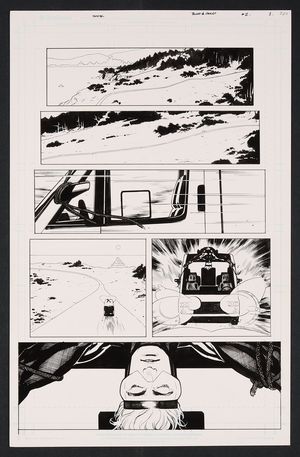
|
Original Art from Blue and Gold #2 (2021) Page 1 Pencils and Inks by Ryan Sook 2021 DC Booster Gold tests the limits of self driving cars! A well crafted, downright cinematic opening page with wide shots that slowly close in to reveal that Booster in a bad way, tied to the hood of a driverless car heading straight for a cliff edge!. Pencil and ink on Comics art board. 11" X 17". |
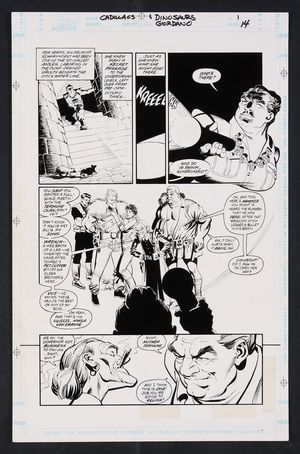
|
Original Art from Cadillacs and Dinosaurs #1 (1994) Page 14 Pencils and Inks by Dick Giordano In auction ending July 15 1994 After sending Hannah and Felicia into the swamp to find any trace of Felicia's father and his research, the once-mole now-Governor Helmina Scharnhorst descends into the vaults of the city in the sea. There she meets Mother Terhune and her Home Depot-inspired sons Wrench, Vice (with his main squeeze Mikla Von Ermine), and Hammer. Pencil and ink on Topps art board. 11" X 17". |
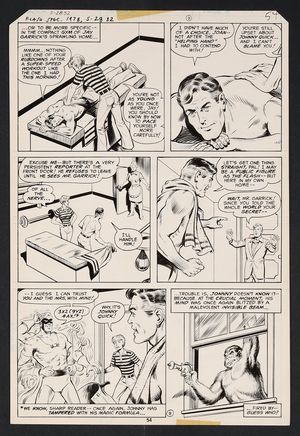
|
Original Art from DC Special Series #11 (1979) Page 54 Pencils by Kurt Schaffenberger, Inks by Murphy Anderson 1979 DC This page from the Flash spectacular features Jay Garrick getting a much needed rub down from his wife after his earlier super speed exploits when Johnny Quick shows up and reveals his true identity. Things are about to get even more hectic as Gorilla Grodd uses his ray gun on Johnny. Can the Scarlet speedster stop this irate primate or will it be to much for him to overcome? Pencil and ink on DC comics art board. 10 3/4" X 15 3/4". |
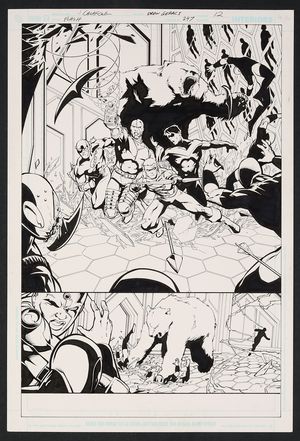
|
Original Art from Flash #247 (2009) Page 12 Pencils by Jim Calafiore, Inks by Drew Geraci 2009 DC A fantastic 3/4 splash from the final issue of Wally's Flash series! With Linda barely clinging to life, Jai and Iris kidnapped, and his powers on the fritz, Wally is gonna need some help. Thankfully he's got some powerful friends as we see Cyborg, Arsenal, Beast Boy (in bear form), and Nightwing bust into Queen Bee's hideout alongside the Scarlet Speedster to rescue the kids. Pencil and ink on DC comics art board. 11 1/2" X 17". |
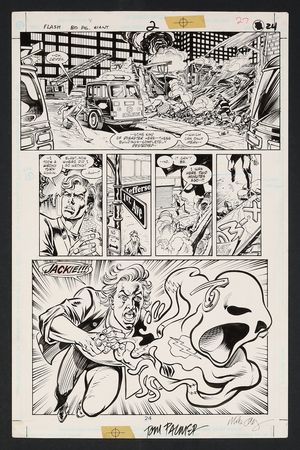
|
Original Art from Flash 80-Page Giant #2 (1999) Page 24 Pencils by Mike Collins, Inks by Tom Palmer 1999 DC In the "Last Dance" story from this oversized anthology special, we see Wally as he tries to juggle all of his new responsibilities as the Flash with his active night life- by trying to be in three places at once! As Wally rushes from one date to another, he realizes the ladies will have to wait because the Flash is needed! A fantastic, boldly drawn panel of Wally readying his suit caps off this beautiful page. Signed by Mike Collins and Tom Palmer in the lower right margin. Pencil and ink on DC comics art board. 11" X 17". |

|
Original Art from Flash Annual #3 (1989) Page 4 Pencils and Inks by Don Simpson 1989 DC From "A Chunk at the JLI!" Chunk and Wally attempt to build the Flash's Matter Transferal Tube but, due to an error while using Bart Sturm's Amplifying helmet, Wally's brain is fried. What follows is a light hearted, slapstick story where our two heroes ruin the day of a certain Green Lantern. Fantastic work on this page the great Simpson who's very much in his element with this story. Also included is Simpson's full-sized prelim for the page. Final page is pencil and ink on DC comics art board and measures 11" X 16 1/4", prelim page pencil and ink on paper and measures 12" x 19". Both pages are signed by Simpson in the lower right. Prelim page is folded. |
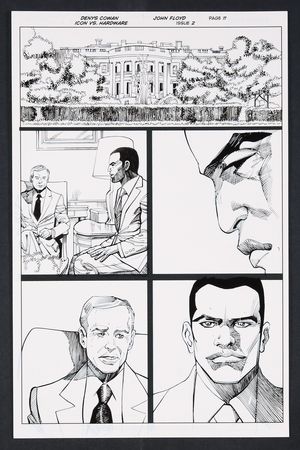
|
Original Art from Icon vs. Hardware #2 (2023) Page 11 Printed Pencils by Denys Cowan, Inks by John Floyd 2023 DC In a very tense meeting, Curtis Metcalf (Hardware) meets with the President of the United States at the White House- we'll leave it to readers to decide which, if any, real life president is being depicted here. In the meeting the President commands Curtis to begin manufacturing the "Q juice" for use in the military despite his concerns and threatens him with "the opposite of a pardon" if he refuses to comply. Ink over printed pencils on comic art board. 11" X 17". |
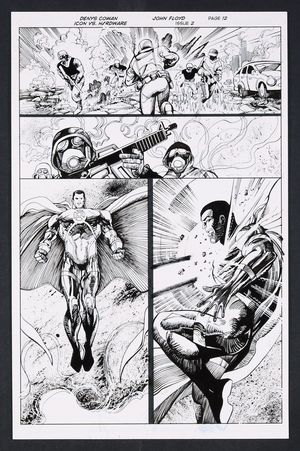
|
Original Art from Icon vs. Hardware #2 (2023) Page 12 Printed Pencils by Denys Cowan, Inks by John Floyd 2023 DC As Curtis Metcalf (Hardware) deals with the problems that come along with becoming a major defense contractor, Icon continues his mission to stabilize the world- something he finds is more difficult than he'd like! Cowan and Floyd combine powerful figure work and energetic background flourishes here to create an incredible sense of battlefield atmosphere. Ink over printed pencils on comic art board. 11" X 17". |
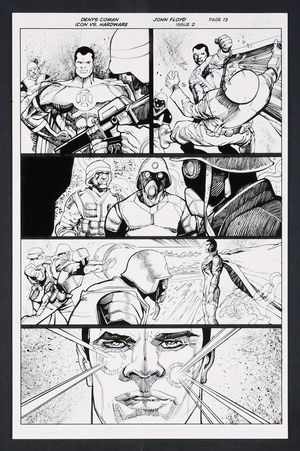
|
Original Art from Icon vs. Hardware #2 (2023) Page 13 Printed Pencils by Denys Cowan, Inks by John Floyd 2023 DC Less than impressed with these newly manufactured super soldiers, Icon demands that they end their long-running war. After they refuse his request to stand down he decides its time for a more hands on approach. He's not mad he's just disappointed. A fantastic final panel on this page with a close shot of Icon completely unaffected by the bullets and energy blasts. Ink over printed pencils on comic art board. 11" X 17". |
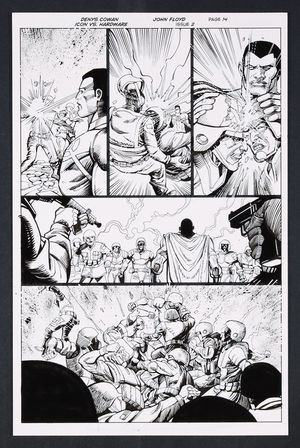
|
Original Art from Icon vs. Hardware #2 (2023) Page 14 Printed Pencils by Denys Cowan, Inks by John Floyd 2023 DC In a great action page, Icon's attempt to quickly end a war with a display of power and minimal amount of violence is not going great! After taking out four soldiers like it was nothing, Icon stops and asks the other soldiers if they are ready to listen. Rather than heeding his words these soldiers instead decide to dogpile on top of one of the strongest beings on the planet. Great idea guys. Ink over printed pencils on comic art board. 11" X 17". |
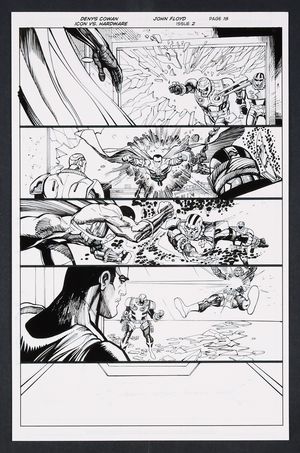
|
Original Art from Icon vs. Hardware #2 (2023) Page 18 Printed Pencils by Denys Cowan, Inks by John Floyd 2023 DC Perhaps this series should have been titled Icon vs. Hardwares! With the 'original' Hardware returned to this altered timeline, they may have a chance at taking on the ultra-powerful Icon- as long as the 'original' Hardware can share some upgrades with his counterpart. A great fight page told with several 'widescreen' panels injected with a nice dose of Kirby Krackle! Ink over printed pencils on comic art board. 11" X 17". |
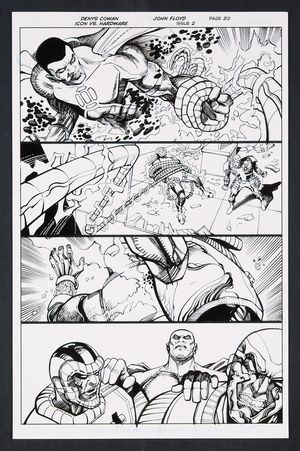
|
Original Art from Icon vs. Hardware #2 (2023) Page 20 Printed Pencils by Denys Cowan, Inks by John Floyd 2023 DC With the Hardwares thinking they've got the upper hand, Icon takes the gloves off to show them exactly how powerful he is. A great sequence here with Icon breaking free from Hardware's plasma whip and instantly appearing behind the two- no more holding back! Ink over printed pencils on comic art board. 11" X 17". |
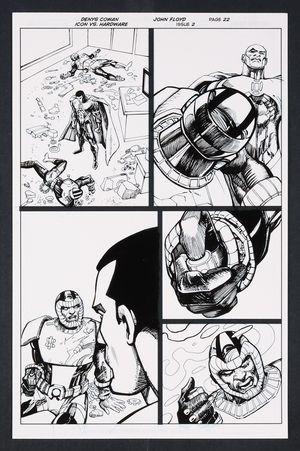
|
Original Art from Icon vs. Hardware #2 (2023) Page 22 Printed Pencils by Denys Cowan, Inks by John Floyd 2023 DC Out of respect of the beating he just received at the hands of Icon, the time-jumping Hardware goes into exposition mode explaining how he altered the timeline and why. The two come to a bit of an understanding here as Hardware concedes Icon might be right... or not before jumping back into the timestream. Ink over printed pencils on comic art board. 11" X 17". |
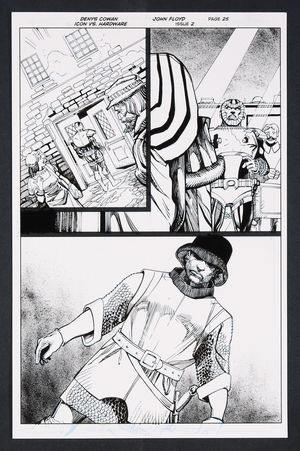
|
Original Art from Icon vs. Hardware #2 (2023) Page 25 Printed Pencils by Denys Cowan, Inks by John Floyd 2023 DC Convinced by some strong words (and hits) from Icon to undo the changes he made to the timeline, Hardware turns his attention to the MUCH further past, going back to 15th century Portugal. Whatever he's planning, he's gonna look cool as hell while doing it! Ink over printed pencils on comic art board. 11" X 17". |
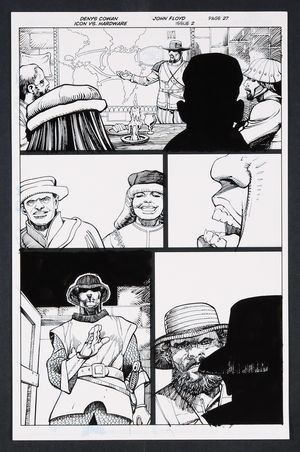
|
Original Art from Icon vs. Hardware #2 (2023) Page 27 Printed Pencils by Denys Cowan, Inks by John Floyd 2023 DC After his attempt to 'fix' events during his own life didn't work out, Hardware has decided to take even more drastic measures. Travelling to 15th century Portugal intending to stop the slave trade, he's about to meet some unexpected opposition... Ink over printed pencils on comic art board. 11" X 17". |
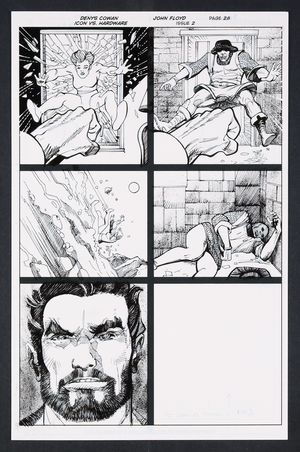
|
Original Art from Icon vs. Hardware #2 (2023) Page 28 Printed Pencils by Denys Cowan, Inks by John Floyd 2023 DC A great last page reveal across the timestream! In the present Rocket is confronted by a mysterious faculty member at her new boarding school while in 15th century Portugal, Hardware is stymied in his attempt to stop the slave trade before it starts. The villain stymieing both of our heroes? The immortal Vandal Savage! Ink over printed pencils on comic art board. 11" X 17". NOTE: The first and third panels on this page are from a portion of the story that followed Rocket to boarding school. In the published issue, Rocket's story is drawn by Yasmin Flores Montanez. |
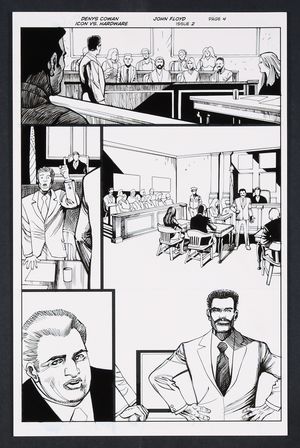
|
Original Art from Icon vs. Hardware #2 (2023) Page 4 Printed Pencils by Denys Cowan, Inks by John Floyd 2023 DC The trial of Curtis Metcalf! Falsely accused of murder after bullets fired by security guards ricochet off Hardware's armor and kill the head of Edwin Alva, Curtis is in a tough spot and his time-travelling, super-suited self has returned to his own time. Good thing Curtis has a great lawyer- and hard evidence! Ink over printed pencils on comic art board. 11" X 17". |
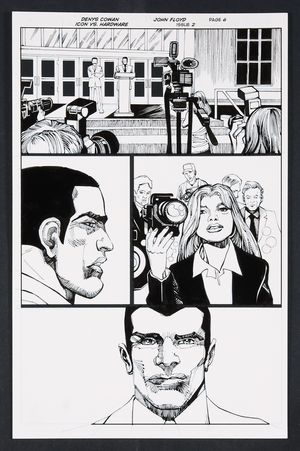
|
Original Art from Icon vs. Hardware #2 (2023) Page 6 Printed Pencils by Denys Cowan, Inks by John Floyd 2023 DC Freshly exonerated from a crime he did not commit, Curtis Metcalf holds a press conference to announce his intention to return to his job at Alva industries and his big plans for the company. One word...Superpowers. Ink over printed pencils on comic art board. 11" X 17". |
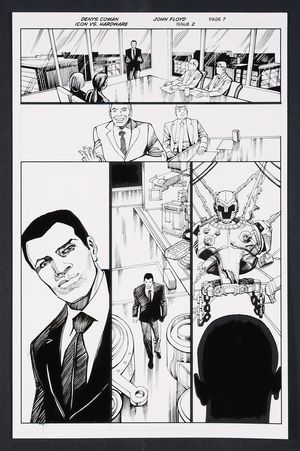
|
Original Art from Icon vs. Hardware #2 (2023) Page 7 Printed Pencils by Denys Cowan, Inks by John Floyd 2023 DC Cleared of a spurious murder charge, Curtis Metcalf (Hardware) is unanimously voted in as the new CEO of Alva Industries, and his first order of business- pushing development on Q Juice, the chemical that can give humans superpowers. Later, in Curtis's private lab we see that he is working on building the armor that his time traveling future self was wearing when he created this new timeline. Ink over printed pencils on comic art board. 11" X 17". |
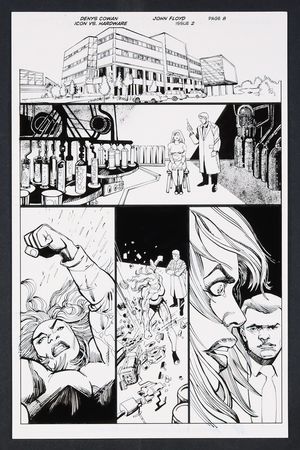
|
Original Art from Icon vs. Hardware #2 (2023) Page 8 Printed Pencils by Denys Cowan, Inks by John Floyd 2023 DC As Curtis Metcalf (Hardware) begins to get Alva Industries in order as its new CEO, trouble is afoot at an Alva lab in Sadaqah! A test subject is injected with the experimental Q Juice giving her super strength. All seems to be going well until the last panel where we can see the look of terrible realization cross the woman's face. Ink over printed pencils on comic art board. 11" X 17". |
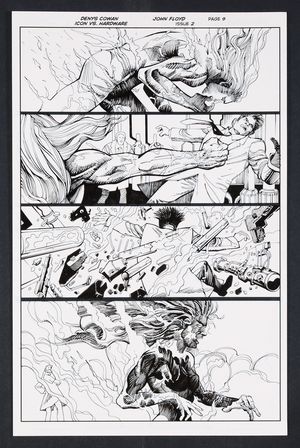
|
Original Art from Icon vs. Hardware #2 (2023) Page 9 Printed Pencils by Denys Cowan, Inks by John Floyd 2023 DC Beautiful line work on this frenetic page as the human test subject for Alva Industries' Q Juice begins to burn up and becomes overwhelmed with the urge to destroy the lab! Ink over printed pencils on comic art board. 11" X 17". |
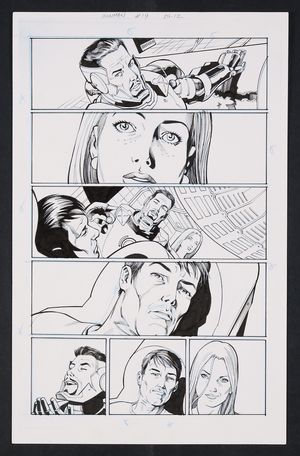
|
Original Art from Iron Man #19 (2014) Page 12 Inks by Scott Hannah Printed Pencils by Joe Bennett In auction ending July 15 2014 Marvel After revealing his big plan to change Mandarin City from the crumbling mess it is into some kind of city of the future, Tony decides to give Pepper one more surprise in the form of Arno Stark, Tony's bed ridden genius adoptive brother- and possibly Iron Man 2020! Printed pencils and ink on art board. 11" X 17". |
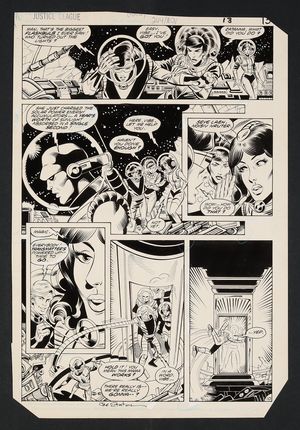
|
Original Art from Justice League of America #244 (1985) Page 10 Pencils by Joe Staton, Inks by Mike Machlan 1985 DC In this crossover, the Justice League is on the run from Infinity Inc.! After the beating they took last issue Martian Manhunter makes the executive decision that the team of Vibe, Zatana, Elongated man, Gypsy, and himself are not going to be enough and decides to look out of universe in search of aid. A great example of the fun dynamic this fan-favorite JLA lineup had! Signed by Joe Staton in the lower middle margin. Pencil and ink on SC comics art board. 11" X 16 1/4". |
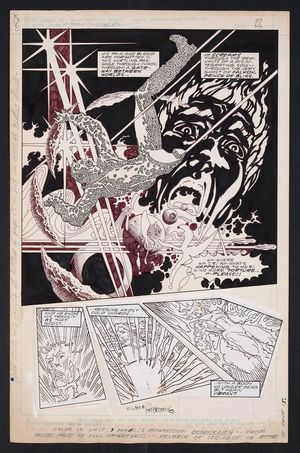
|
Original Art from Lord of the Ultra Realm #1 (1986) Page 22 Pencils and Inks by Pat Broderick In auction ending July 15 1986 DC Michael Savage, a disgraced marine now back in the United States, gets transported through a mirror into the world of the Ultra Realm. Here he takes over the body of the fallen Falkon, the Lord of Bliss, after his battle with Maurkon. Broderick taps in to the adventurous Silver Age work of Steranko and Kirby for this beautiful page. Signed and personalized "to Wayne" by Pat Broderick in the bottom center of the page. Pencil and ink on comic art board. 13" X 20". NOTE: The bottom three panels are printed stats with some additional original markings. |
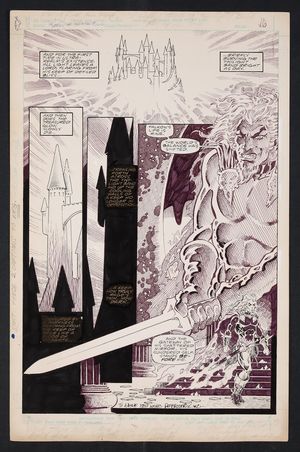
|
Original Art from Lords of the Ultra Realm #1 (1986) Page 16 Pencils and Inks by Pat Broderick In auction ending July 15 1986 DC After defeating Falkon, the Lord of Bliss, Maurkon, Lord of Rage, begins engulfing Falkon's keep in the darkness making it a dark twin of his own castle. Broderick does an amazing job of giving Maurkon an imposing figure with his sword literally slicing through the page shaded wonderfully with striking crosshatching. Signed and personalized "To Wayne Best wishes" by Broderick at the bottom center of the page. Pencil and ink on comic art board. |
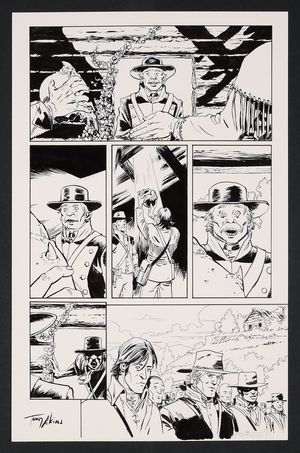
|
Original Art from Manifest Destiny #20 (2016) Page 1 Inks by Tony Akins, Printed Pencils by Matthew Roberts 2016 Image A terrifying take on the legendary journey of Lewis and Clark, the expedition has been waylaid by rough weather and a lack of food- which has turned the men to cannibalism. As the situation gets even more tense, Lewis and Clark discover a skull in the fireplace of a derelict cabin...a cyclops skull! Signed by Akins in lower left. Ink over printed pencils on art board. 11" X 17". |
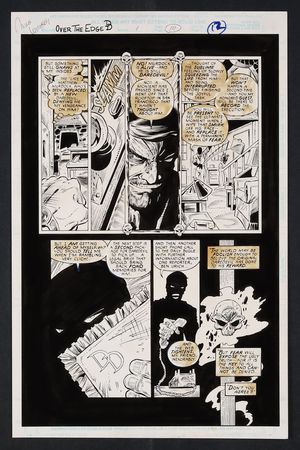
|
Original Art from Over the Edge #1 (1995) Page 10 Pencils by Robert E. Brown, Inks by Mike Witherby In auction ending July 15 1995 Harold Cranstone appears to be a mild mannered unassuming law professor at the prestigious Columbia Wniversity where teachers have started going missing. In reality he is none other than Larry Cranston- the third Mr.Fear and the one responsible for all of the disappearances as part of his plan to settle a personal grudge with Matt Murdock, the hero known as Daredevil. Signed by Witherby in the upper left hand corner. Pencil and ink on Marvel Comics art board. 11" X 17". |
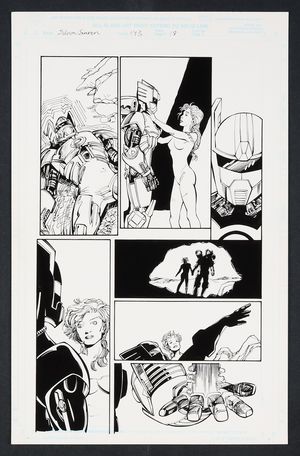
|
Original Art from Silver Surfer #143 (1998) Page 18 Pencils by Denys Cowan, Inks by John Floyd 1998 Alicia Masters might be stranded but she's not alone now that her Robot captor/protector, Cy-Phyra-4, has completed its self repair protocols. Suddenly aware of an energy probe from Tenebrae, Cy-phyrr 4 decides that for them to get off this planet, Alicia's "current configuration" is unsuitable. Could she be getting an 'upgrade' soon? Pencil and ink on Marvel Comics art board. 11" X 17 1/4". |
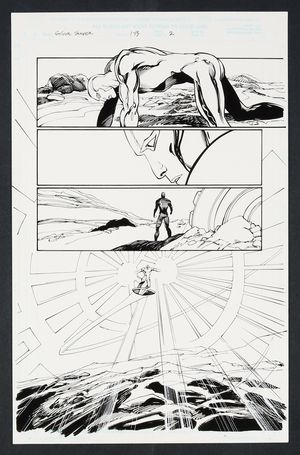
|
Original Art from Silver Surfer #143 (1998) Page 2 Pencils by Denys Cowan, Inks by John Floyd 1998 Marvel Fresh from battle with the Coroner and back on his adopted home world of Earth, the Silver Surfer has no time bask in the glow of victory- one of his closest friends, Alicia Masters, is missing and its up to the Surfer to track her down. A beautiful page that sees the spacefaring hero pushing through exhaustion to rise once more in a an epic half splash as he soars back into action. Pencil and ink on Marvel Comics art board. 11" X 17 1/4". |
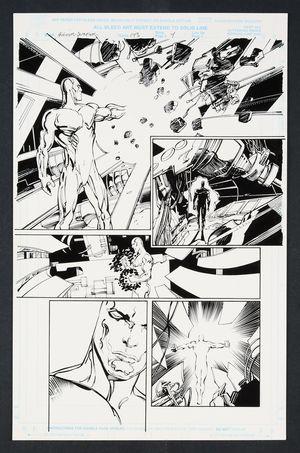
|
Original Art from Silver Surfer #143 (1998) Page 4 Pencils by Denys Cowan, Inks by John Floyd 1998 Marvel The Surfer's rage almost gets the better of him as he infiltrates Tenebrae's ship and nearly destroys the very machine that can lead him straight to the missing Alicia Masters. Using his powers (of course depicted with some Kirby Krackle!), he probes the quantum layers of the machine and discovers Tenebrae's location. Longtime collaborators Cowan and Floyd look spectacular here, especially in the fourth panel closeup on Surfer's face. Pencil and ink on Marvel Comics art board. 11" X 17 1/4". |
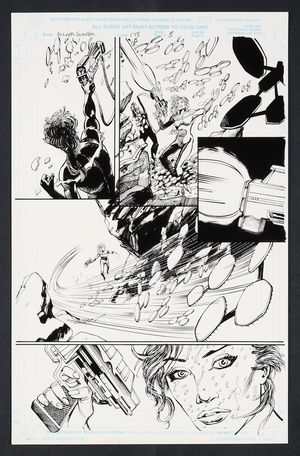
|
Original Art from Silver Surfer #143 (1998) Page 8 Pencils by Denys Cowan, Inks by John Floyd 1998 Marvel A rare sight in comics- an Alicia Masters action page! One of Marvel's best non-"super" characters, Alicia here finds herself stranded on an alien world and beset by swarms of biomechanical creatures leaving her feeling "like Sigourney Weaver in those 'Alien' films." A dynamic page with some great action panels and a beautiful close shot of Alicia as she finally finds her cyborg companion Cy-phyrr 4. Pencil and ink on Marvel Comics art board. 11" X 17 1/4". |

|
Original Art from Silver Surfer #146 (1998) Page 11 Pencils by Denys Cowan, Inks by John Floyd 1998 Marvel The battle of the heralds begins! Accidentally caught in a nuclear bomb test, Firelord has begun an all-out assault on the nation of Kakistia and only one hero can stop him! As Firelord hurls a massive blast of energy towards the military complex that initiated the test, Silver Surfer arrives in spectacular fashion, shielding the facility and stylishly entering the fight- with a trail of Kirby Krackle in his wake! Pencil and ink on Marvel Comics art board. 11" X 17 1/4". |
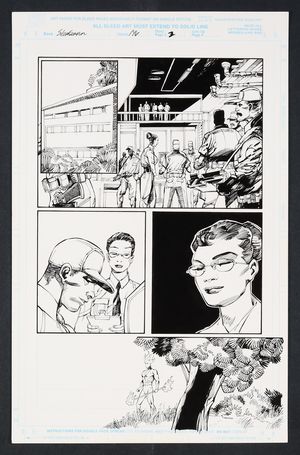
|
Original Art from Silver Surfer #146 (1998) Page 2 Pencils by Denys Cowan, Inks by John Floyd 1998 Marvel As the final issue of this series opens, former Herald of Galactus Firelord has come to the Asian nation of Kakistia to "celebrate life with the vast and varied creatures" found on Earth. Unfortunately for him, those creatures include humans- including those of the Kakistian government who are about to test a nuclear weapon on the very spot he's standing. Pencil and ink on Marvel Comics art board. 11" X 17 1/4". |
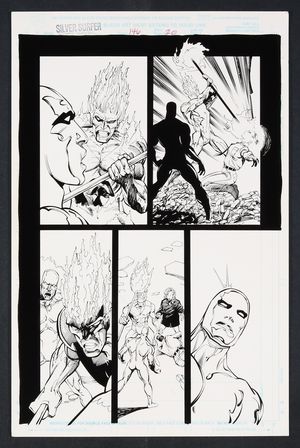
|
Original Art from Silver Surfer #146 (1998) Page 20 Pencils by Denys Cowan, Inks by John Floyd 1998 Marvel An incredibly dramatic page as the Battle of the Heralds reaches its conclusion! Firelord came to Earth for a bit of peace and quiet in nature, unaware that he was at the center of a nuclear test site. After the bomb was detonated, he began an assault on the nation of Kakisita, stopped only due to the Surfer's intervention. With the herald on herald action concluded, the military scientist who designed the weapon and ordered the test appears to take responsibility- which could potentially be deadly! Cowan and Floyd sell this moment perfectly, leaving readers in suspense until panel four where it's revealed that the scientist still lives. Pencil and ink on Marvel Comics art board 11" X 17 1/4". |
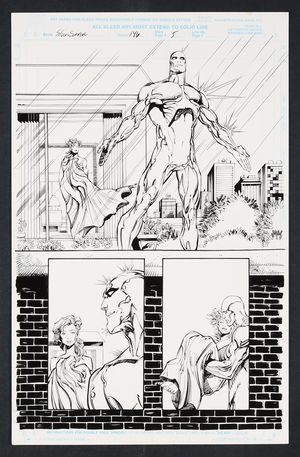
|
Original Art from Silver Surfer #146 (1998) Page 5 Pencils by Denys Cowan, Inks by John Floyd 1998 Marvel Surfer's first on page appearance in the final issue of his long-running series is gloriously rendered by longtime collaborators Cowan and Floyd as basks in the sunrise over New York City waiting for his companion Alicia Masters to wake. Pencil and ink on Marvel Comics art board. 11" X 17 1/4". |
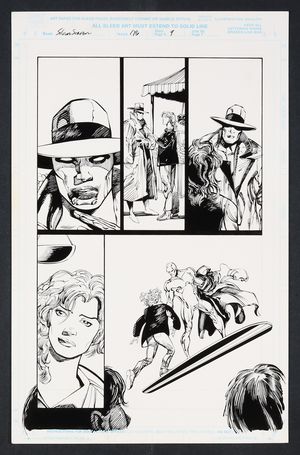
|
Original Art from Silver Surfer #146 (1998) Page 9 Pencils by Denys Cowan, Inks by John Floyd 1998 Marvel A great page featuring the Surfer in Marvel's classic incognito-hero garb- a fedora and a trench coat! Hoping to spend a quiet day in the city with Alicia Masters, news of Firelord's attack on the nation of Kakistia instead calls for action and Alicia refuses to be left out. The beautiful final panel of Surfer lifting Alicia onto his board is the highlight of this page, capturing the essence of the character wonderfully. Pencil and ink on Marvel Comics art board. 11" X 17 1/4". |

|
Original Art from Trinity #19 (2008) Page 20 Inks by John Floyd, Printed Pencils by Mike Norton 2008 DC Something isn't right in the world! After the Troika's victory, Superman, Batman, and Wonder Woman are erased from existence- though their legacies do endure in the subconscious of the world's citizens. Some great action on this page as Firestorm, unaffected by the change and trying to make sense of this new reality, stops to take down Mammoth triggering a memory of the original Justice League in a civilian- a fantastic half-splash of the JLA rushing into action! Ink over printed pencils on DC Comics art board. 11" X 17". |
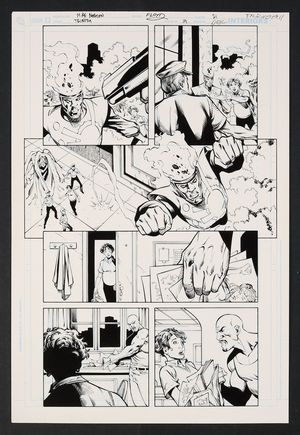
|
Original Art from Trinity #19 (2008) Page 21 Inks by John Floyd, Printed Pencils by Mike Norton 2008 DC In a world where Batman, Superman, and Wonder Woman never existed, those who remain struggle with both the new order of the world and with visions of what should be. As Firestorm finds his heroics not welcome here, a civilian named Desiree returns home to find her abusive husband unhappy with her drawings of the world before. Ink over printed pencils on DC Comics art board. 11" X 17". |

|
Original Art from Trinity #19 (2008) Page 22 Inks by John Floyd, Printed Pencils by Mike Norton 2008 DC In a world where Wonder Woman, Superman, and Batman never existed, the residents of earth yearn for an existence that's just of their minds' reach. In this tragic final page, a young woman named Desiree mourns the burned remnants of her drawings depicting the world of heroes and in the narration wishes for "someone who could help make the world better..." Ink over printed pencils on DC Comics art board. 11" X 17". |
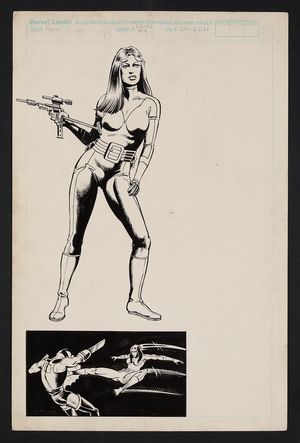
|
Original Art Unused Marvel Handbook Entry for Leiko Wu by David Day 1980s Marvel Even a tome as comprehensive as the Official Handbook of the Marvel Universe has some limitations and unfortunately this great piece of art and the entry for its subject was cut from the issue. Leiko Wu is a mainstay of Shang-Chi comics, first appearing in Master of Kung Fu #33 and continuing on as a supporting character to the present day! Pencil and ink on Marvel Comics art board. 11 1/4" x 17". |
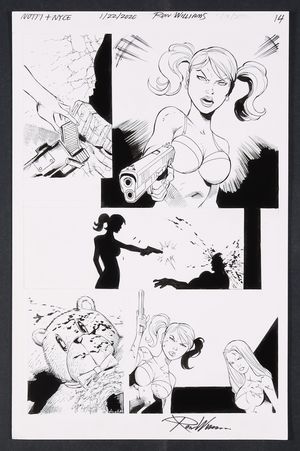
|
Original Art from Unidentified Notti and Nyce Issue (c. 2020) by Ron Williams Page 14 In auction ending July 15 2020 Finish Him! Nyce and Nastee come out victorious in their fight thanks to Nastee's brilliant choice to just shoot the guy in the head. Signed by the artist. Pencil and ink on art board. 11" x 17" |
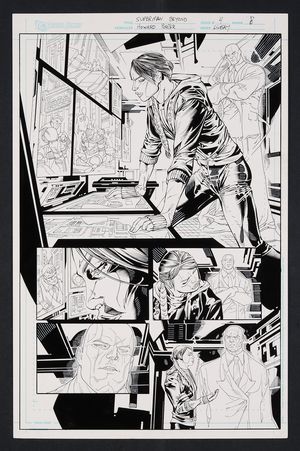
|
Original Art from Superman Beyond #7 (Digital-First, 2012) Page 8 Pencils by Howard Porter, Inks by John Livesay 2012 DC After a long time away in space, Superman has returned to Earth to find things different but the same. Though Lex Luthor has been dead for three years, his influence looms as his illegitimate daughter Lucinda takes over the family business- with an AI copy of his mind watching over her of course! Pencil and ink on DC Comics art board. 11" x 17". NOTE: Though the page is noted as being from issue 4, this page was published in the 7th chapter of the digital-first series. |
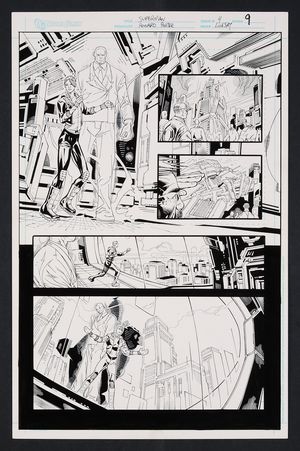
|
Original Art from Superman Beyond #7 (Digital-First, 2012) Page 9 Pencils by Howard Porter, Inks by John Livesay 2012 DC In this future-set story, Lucinda Luthor has been working with an AI of her deceased father to carry on his legacy from the shadows- but it's time to step out into the light as AI-Lex reveals that the building they've been operating out of is in fact a giant mech! Pencil and ink on DC Comics art board. 11" x 17". NOTE: Though the page is noted as being from issue 4, this page was published in the 7th chapter of the digital-first series. |
